|
In the age of 1:1 technology and self grading quizzes from systems like Schoology and Skyward, students are receiving feedback much faster than they ever could with the even the fastest teacher graders. I have seen firsthand the benefits of providing students with the opportunity to see their results and go back to revise their answers. The one drawback that I’ve found with these options is that the feedback still isn’t instantaneous. Students must complete all of the questions in the quiz before they have access to a report. While this really isn’t a long delay, it’s long enough for students to move on so that they are no longer thinking about those problems that they got wrong in the same way that they were when they were “in the moment”. When I want my students to get this feedback before they move on to the next problem, I use the “data validation” feature that is built into Google Forms to check answers against a solution. What makes this different is that the feedback is given to the student BEFORE the form is submitted. In fact, they can’t submit the form until all of their answers have been validated as correct.
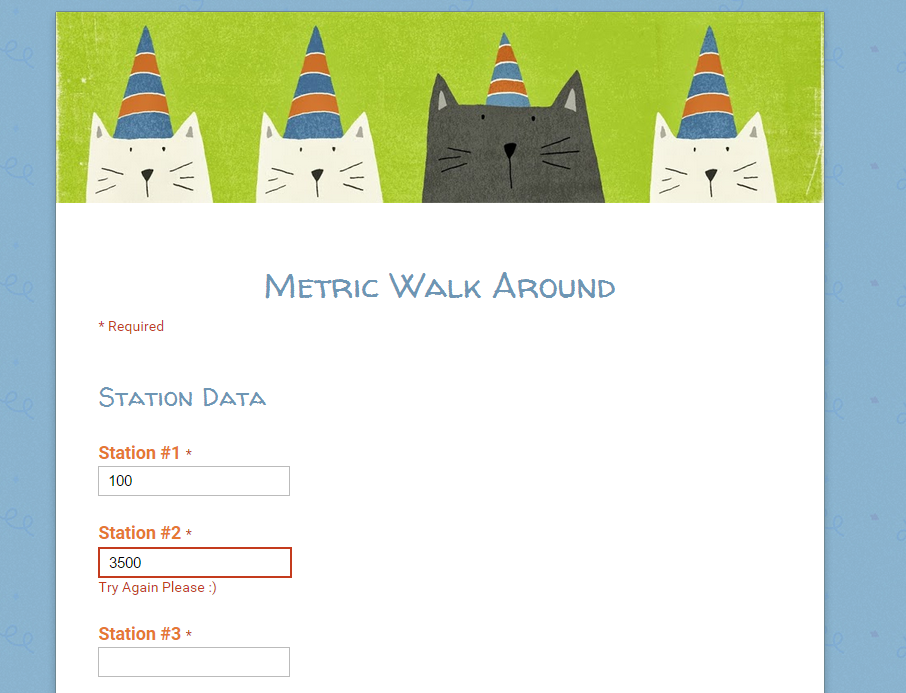
How can this be used?Quizzes/Exit TicketsI’ve used google form validation for quizzes and exit tickets where students follow the link to the form and complete the problems like other online quiz platforms that are available. What makes this different is that students can’t submit until all of their answers are correct. This means that they either have to go back through their notes or ask someone before they can submit. From the response Google Sheet, it is possible to transfer their scores into the gradebook. Since, their answers must be correct before submitting, you know that every submission has earned full credit. Walk AroundsWhen the intent is practice without a grade, I prefer to administer the google form as a walk around activity. With this set up, all of the questions are printed out on stations around the classroom and the form itself is just numbered text boxes for students to enter their answers. I have found that this method works really well for a number of reasons. For one, it gets students out of their seats. In 1:1 technology classrooms, it’s really easy to get into a pattern where transitions occur within their screens (switching from app, to quiz, to website, etc) but not in the physical space of the classroom. Building in a walk around activity breaks up class time with an opportunity to stand and move around. Another benefit that I’ve noticed from the google form walk arounds is that for each question, they are standing next to a classmate that is also working on the same problem. In this arrangement, if a student’s submission turns red (indicating an incorrect answer) they are MUCH more likely to ask a peer for help. If they both can’t get it, they work together or call me over. In a walk around with google forms, students focus on each problem until they are successful and there is always support to help them get there. Card Sort with Many Correct AnswersIn the bonding unit of our Physical Science curriculum, we do an ionic bonding activity where students are assigned element cards and have to find someone else to “bond” with. When they find someone, they both have to write down the correct compound formula. This was a hard activity to provide feedback for in the past because there were so many possible combinations to look for. With this in mind, we decided to add data validation google forms to the mix. By using the right notation, we were able to design the form to accept all of the possible combinations. (with 5 metals and 5 nonmetals, there were 25 combinations to include) After setting up one question with the possibilities, it was very easy to just duplicate that questions. We had them create 10 different compounds (only half of them were “required” so they could submit as long as they did 5) and anything that they typed in that wasn’t written correctly or included different elements not represented by the cards displayed a warning message. Set up your Google Form with ValidationSo now that I’ve shared some of the ways that we’ve used data validation in Google Forms, I wanted to show how easy it is to set up. Step 1: Create your form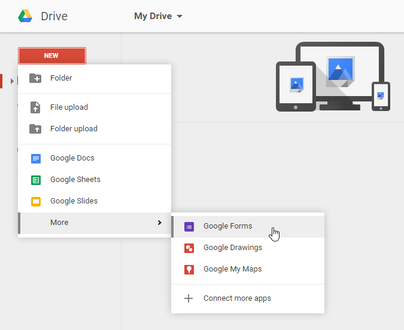 Step 2: Add a new questionThe types of validation that I’ve used works best for “short answer” style questions but other question types have validation options too. Set up your question the same way that you would for any other google form. Step 3: Set up ValidationClick on the three dots in the bottom right hand corner to show the data validation options. Once you click to activate data validation, you can explore the many options that you have to set things up. Use whatever fits your problem best. I typically use this for numerical problems but it accepts text validation as well. Just note that the student will need to enter exactly what you do for it to be accepted. 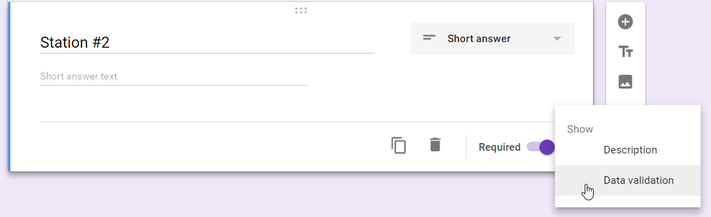 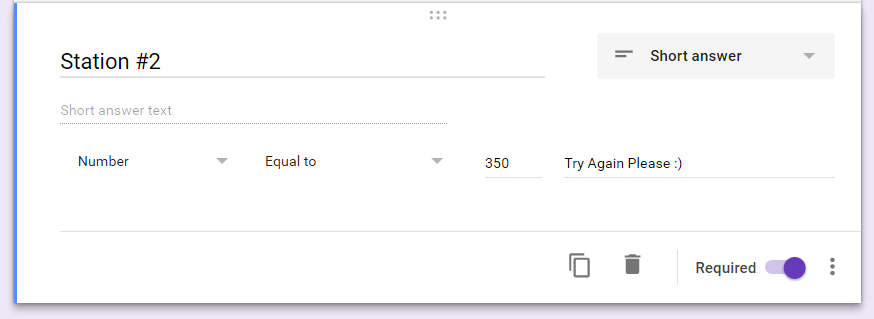 To set up your form to accept multiple different answers, you have to set Data Validation to "Regular Expression" and "Contains." Setting things up requires a little bit of simple coding. Type out all the possible answers separated by the "|" symbol (it's above the enter key) and surround them with parentheses. If students enter any of the text strings that you've included in this list, it will accept their answer. 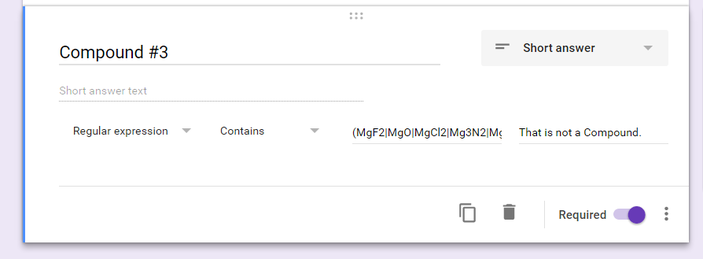 Step 4: Share Form with Students Enjoy as you watch your students persist through problems and work to get each one correct. :D If you have any questions or ideas of other ways to use this technology, please leave a comment below!
Comments
|

Joe CossetteFather, Physics Teacher, Knowles Fellow, Friend, Techie, and Musician Blog Posts |


 RSS Feed
