PASSIONATELY CURIOUS

  • Home
  • About
  • Blog
    • Recent Posts
  • Resources
    • Lessons by Topic >
      • Motion
      • Forces
      • Energy
      • Momentum
      • Circular Motion
      • Waves
      • Electricity
      • Atomic Physics
      • Astrophysics
      • Periodic Table
      • Bonding
      • Chemical Reactions
      • Nature of Science
      • Engineering
    • Collections >
      • Demonstrations
      • Mystery and Breakout Tasks
      • Team Building
      • Mystery Pixel Art
      • Google Form Walk Arounds
      • Design Problems
      • Microsoft Excel
      • Online/Hybrid Lessons
    • Posters
    • 3D Printed Kits >
      • Ionic Bonding Puzzle
      • Radioactive Dice
      • Tangential Velocity Launcher
      • Double Slit - Physical Model
      • Button Battery LED Holder
      • Resonator
      • Cup Balance
      • Penny Circles
    • Teaching Strategies
    • Sessions and Speeches
    • Just For Fun >
      • Science Memes
      • Science Songs
      • Top Tweets
  • Notes
    • Motion
    • Forces
    • Circular Motion
    • Energy and Momentum
    • Waves
    • Electricity
    • Force Fields
    • Thermal Physics
    • Atomic Physics
    • Energy Production
    • Astrophysics
  • IB Physics
    • Units
    • Content Guides
    • Notes
    • Review Guides
    • IA Resources
    • Test Review
    • Study Guide
  • Store
  • Contact Me

Blog

Newton's Law Blocks

10/28/2023

Comments

 
I've introduced thousands of students to Newton's 3 Laws of Motion over the past decade of teaching physics, but besides the occasional "inertia demo", students never really got an opportunity to explore these ideas in a conceptual way. Instead, it was usually a conversation like "imagine that you push two shopping carts where the second one has twice the mass and twice the push..." These were good thinking exercises but, not surprisingly, they weren't all that convincing to students.
Last year, I saw Bruce Yeany's YouTube video on "Newton's laws of motion demonstrated with wooden blocks" and I was inspired to make a set of my own. This blog post outlines the activity and modifications that I made.
Picture

The Activity

I wanted students to explore Newton's laws on their own without me pacing their exploration so I put together a set of challenges for groups to work through and reflect on. These challenges build out many of the same examples that Bruce outlined in his video using student-friendly procedures.
I prefer to start the forces unit with this activity before we've even started talking about Newton's Laws. This way, students get to explore the relationships for themselves. This also gives us a shared experience to reflect back on when we do discuss the laws of motion later on in the unit. :)
This activity was designed for my 9th grade physical science classes in mind but I've used a similar progression for a quick review activity in my IB Physics classes.
Picture
Newton's Law Blocks (pdf)
File Size: 1232 kb
File Type: pdf
Download File

​Newton's Law Blocks (editable Google Doc)

Newton's 1st Law

An object in motion stays in motion and an object at rest stays at rest unless acted on by an unbalanced force
Challenge #1 - "An object at rest, stays at rest"
  1. Connect the rubber band for Block A to the baseboard at position #2
  2. Loosely set an extra block on top of Block A
  3. Holding on to Block A, stretch the rubber band back ~50 cm and release
  4. What happens to the block on top when you release?
Challenge #1 - Animated GIF
Many of my students recognize this as the "tablecloth trick" and it's fun to see them make that connection. It isn't listed in the activity but it's also fun to try this with stacks of three of more blocks on top as well or to experiment with different launch speeds. :)
Challenge #2 - “An object in motion, stays in motion”
  1. Connect the rubber band for Block A to the baseboard in position #2 like the last challenge
  2. Rotate the flat piece of wood on the back of the block so that it is sticking up
  3. Set an extra block on top of Block A so that it is resting on this new backboard
  4. Holding on to Block A, stretch the rubber band back ~50 cm and release
  5. What happens to the block on top when you release?
  6. What happens to the block on top when Block A hits the baseboard?
Challenge #2 - Animated GIF
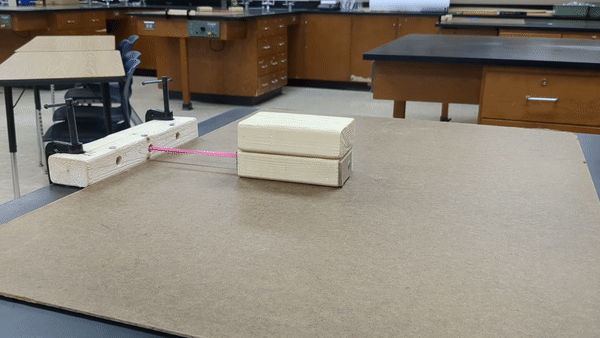
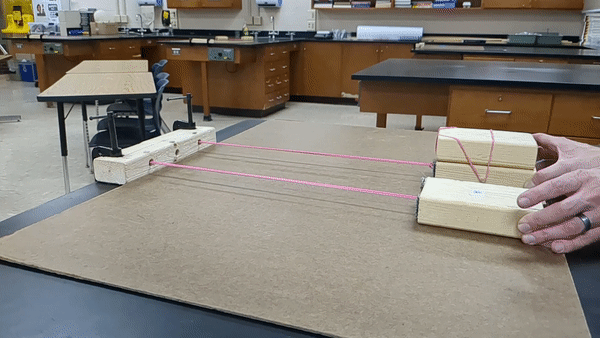
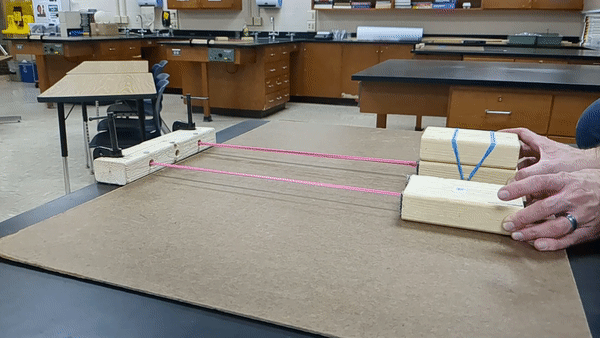
Knowing that this one is coming, it's a good idea to set up the baseboards so that there isn't too much "launching into a crowd" going on. It's also fun to connect the rubber bands to a long board that goes down the middle of the table (like Bruce Yeany's set up) and have students aim for a target with their top block by launching it at just the right speed.

Newton's 2nd Law

The force applied to an object is equal to its mass times the acceleration
Challenge #3 - Race between identical blocks
  1. Remove any extra blocks that from the previous challenge
  2. Connect the rubber band for Block A to the baseboard and connect only one of the rubber bands for Block B to the baseboard. Use positions #1 and #3 so that both blocks fit.
  3. You may need to wrap the second rubber band on block B around the pegs so that it doesn’t drag along the table
  4. Holding on to both blocks, stretch the band back ~50 cm and release at the same time
  5. Which hits first? Why? (hint: it may help to get a slow mo video to analyze)
Challenge #3 - Animated GIF
Challenge #3 - Slow mo GIF
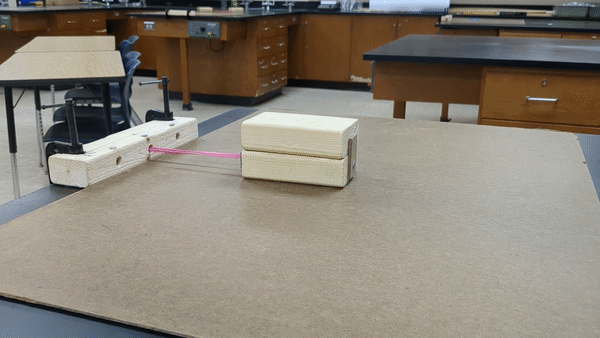
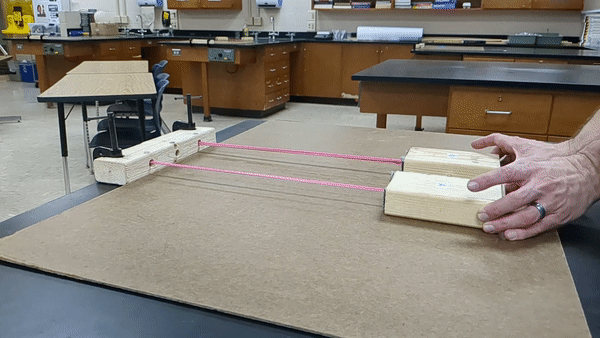
It is highly recommended to have the same person release both blocks to ensure that they are released together. If the blocks still aren't hitting at the same time with this set up, it would be worth checking your rubber bands. Sometimes they wear differently over time and that can result in unintended differences in the force.

Also notice that you can stow the second rubber band from block B by looping it around the pegs to get it out of the way.
Challenge #4 - Double the Mass
  1. Keep blocks connected in the same way as the previous challenge
  2. Take an extra block and set it on top of Block B. Secure it by stretching a rubber band over this extra block and connecting it to the side pegs as shown in the diagram on the right →
  3. Holding on to both Blocks A and B, stretch the rubber band back ~50 cm and release at the same time
  4. Which hits first? Why? (hint: it may help to get a slow mo video to analyze)
  5. ​Add another block (or two!) to the top of Block B and secure it in the same fashion, how does adding more mass affect the motion of the block?
Challenge #4 - Animated GIF
Challenge #4 - Slow mo GIF
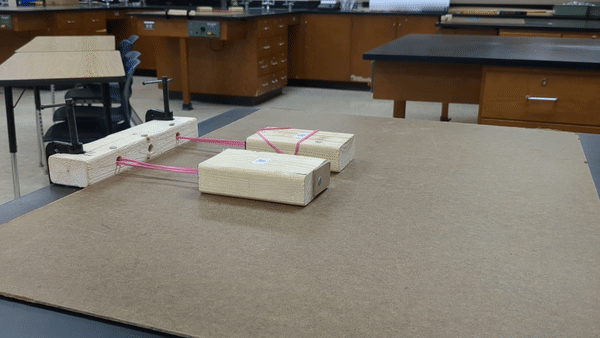
Depending on the strength of the rubber band connection, you can sometimes see inertia at play at the top block resists a change in motion (remember back to Challenges 1 and 2)
Challenge #5 - Double the Force
  1. Remove any extra blocks from the previous challenge
  2. Connect the rubber band for Block A to the baseboard and connect BOTH of the rubber bands for Block B to the baseboard. Use positions #1 and #3 so that both blocks fit.
  3. Holding on to both Blocks A and B, stretch the rubber band back ~50 cm and release at the same time
  4. Which hits first? Why? (hint: it may help to get a slow mo video to analyze)
Challenge #5 - Animated GIF
Challenge #5 - Slow mo GIF
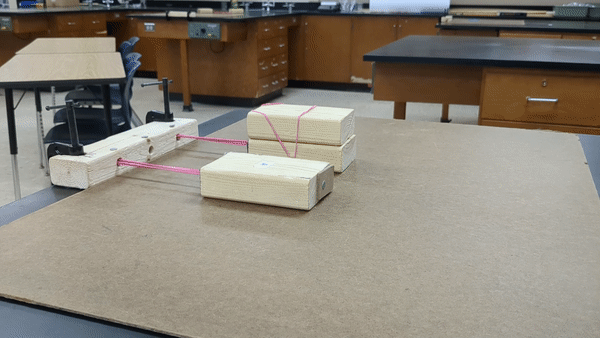
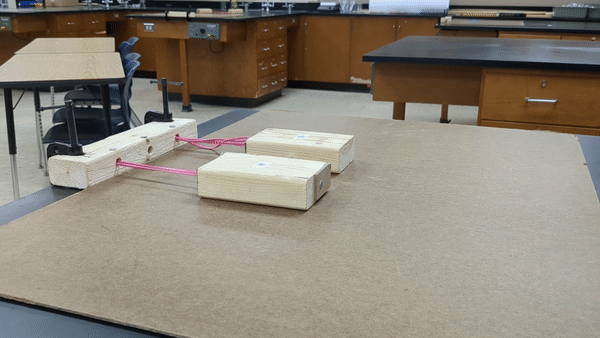
This one happens really fast and it's a good opportunity to try out the slow-mo method so that it's ready for the next challenge. It's quick but the double rubber band block demonstrates about twice as much acceleration.
Challenge #6 - Double the Force AND the Mass
  1. Keep the same rubber band configuration from the previous challenge so Block A should be connected by one band and Block B should be connected by two bands.
  2. Take an extra block and set it on top of Block B. Secure it by stretching a rubber band over this extra block and connecting it to the side pegs. When done, Block B should have two rubber bands and two blocks.
  3. Holding on to both Blocks A and B, stretch the rubber band back ~50 cm and release at the same time
  4. Which hits first? Why? (hint: it may help to get a slow mo video to analyze)
Challenge #6 - Animated GIF
Challenge #6 - Slow mo GIF
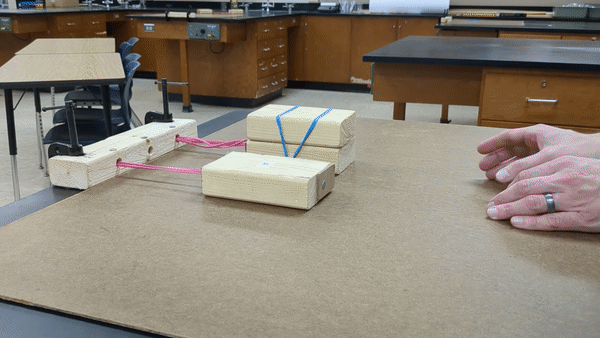
This is really the culminating event of this entire activity and SO satisfying to see them hit at the exact same time. It can be challenging to release both blocks at the same time so often if students think that one is hitting first, I challenge them to look at the slow-mo and verify that both blocks were truly released together. It could work to use a ruler or meter stick to hold them back and start them at the same time if independent hands doesn't work out.

Newton’s 3rd Law

Every action force has an equal and opposite reaction force
Challenge #7 - Tug of War
  1. Remove blocks from the baseboard and instead connect the rubber bands for Block A and Block B to each other using a paper clip
  2. Keeping both blocks on the table, have one person pull the blocks away from each other and release
  3. When the blocks pull together, where do they meet? Does pulling back more or less affect this collision location?
  4. What if you connect both rubber bands from block B to the paperclip? Do the blocks still meet in the middle when released from the same locations as before?
Challenge #7.1 - Animated GIF
Challenge #7.2 - Animated GIF
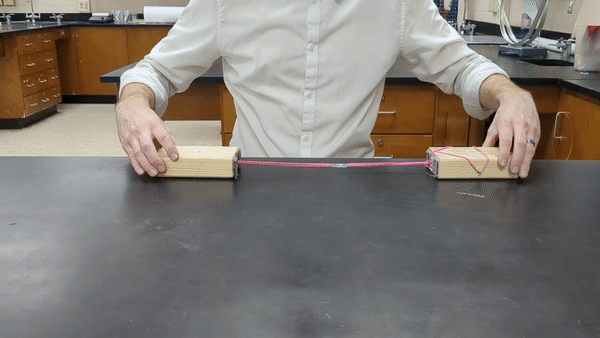
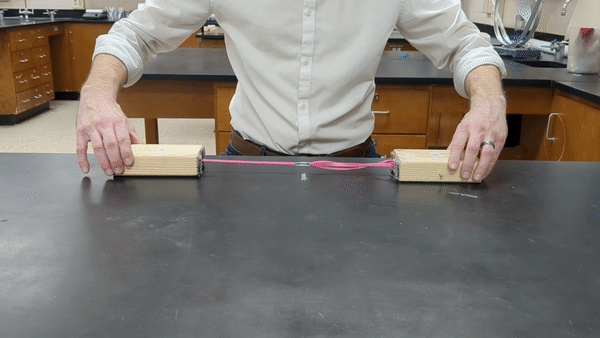
If you have students pull the blocks back to each end of a meter stick, you can make this one a little more quantitative and actually have a reference point to show that they meet at the halfway point regardless of how the rubber bands are connected.
Challenge #8 - Tug of War with Different Masses
  1. Connect the rubber bands for Block A and Block B to each other using a paper clip
  2. Take an extra block and set it on top of Block B. Secure it by stretching a rubber band over this extra block and connecting it to the side pegs. 
  3. Keeping both blocks on the table, have one person pull the blocks away from each other and release
  4. When the blocks pull together, where do they meet? How is this different from the last challenge when the blocks had the same mass?
Challenge #8 - Animated GIF
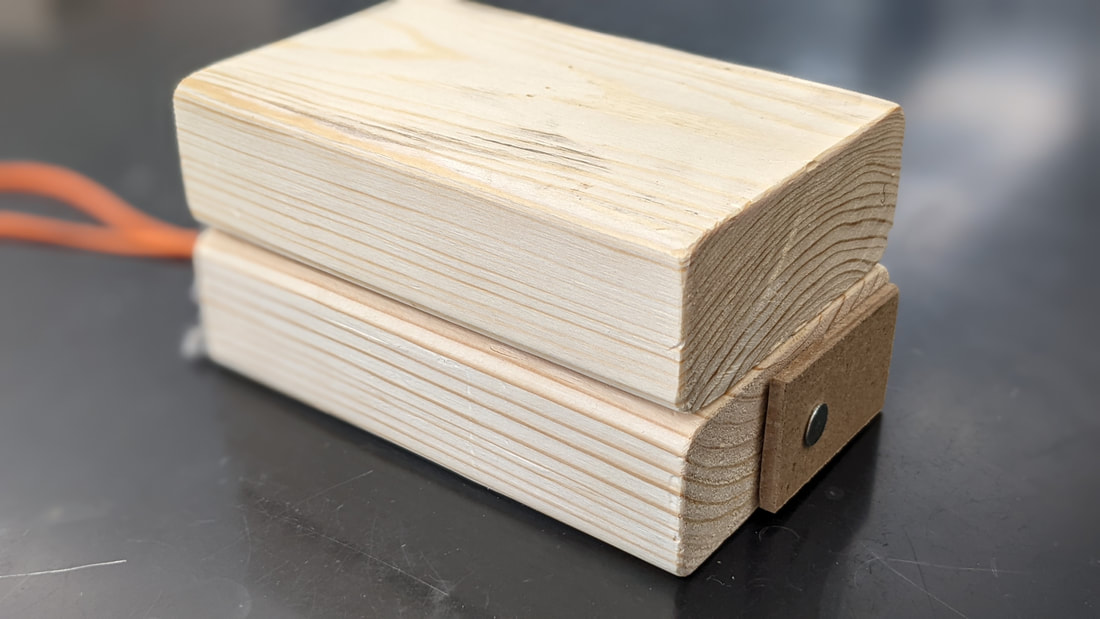
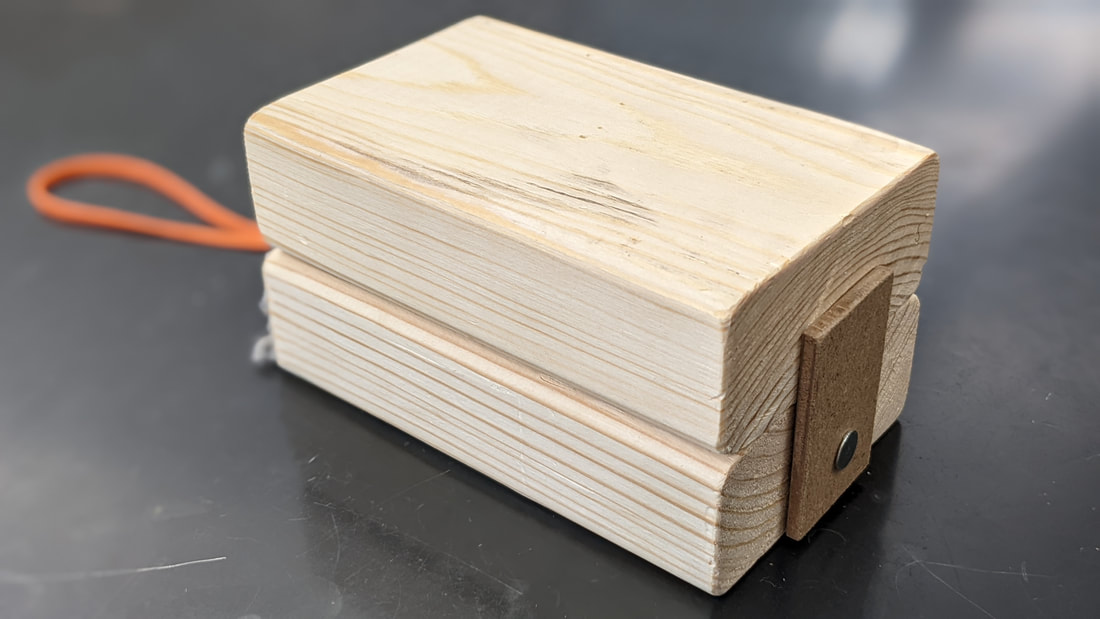
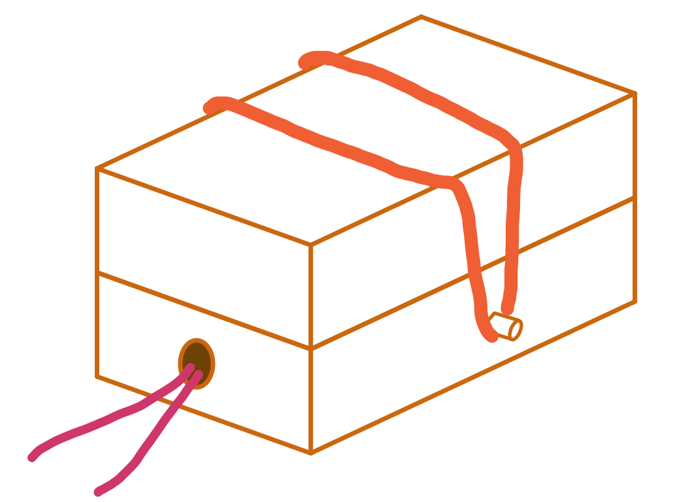
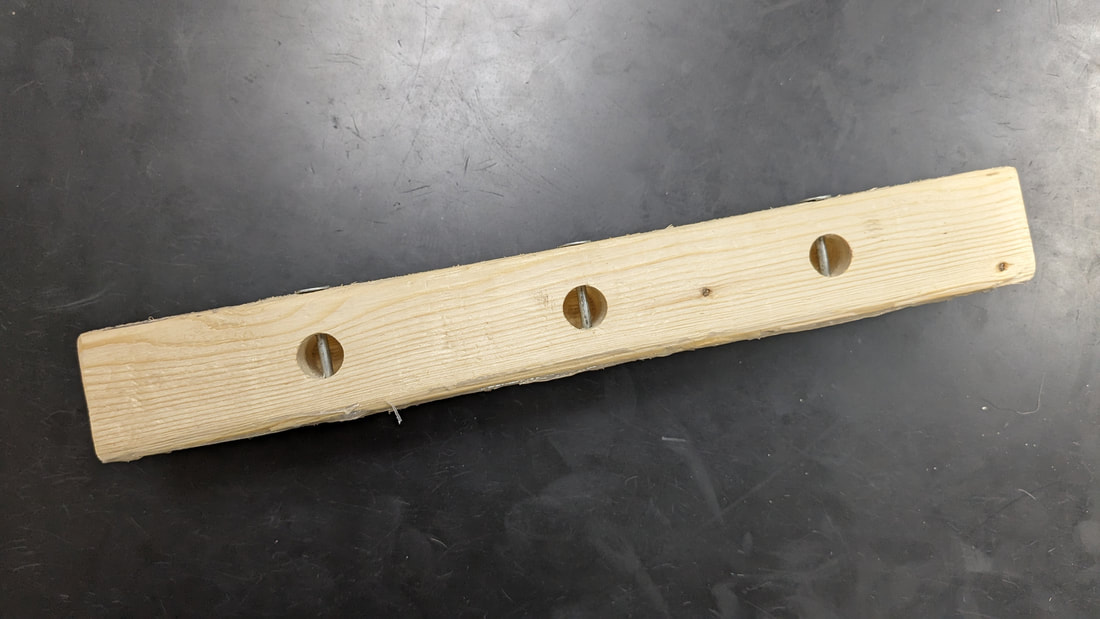
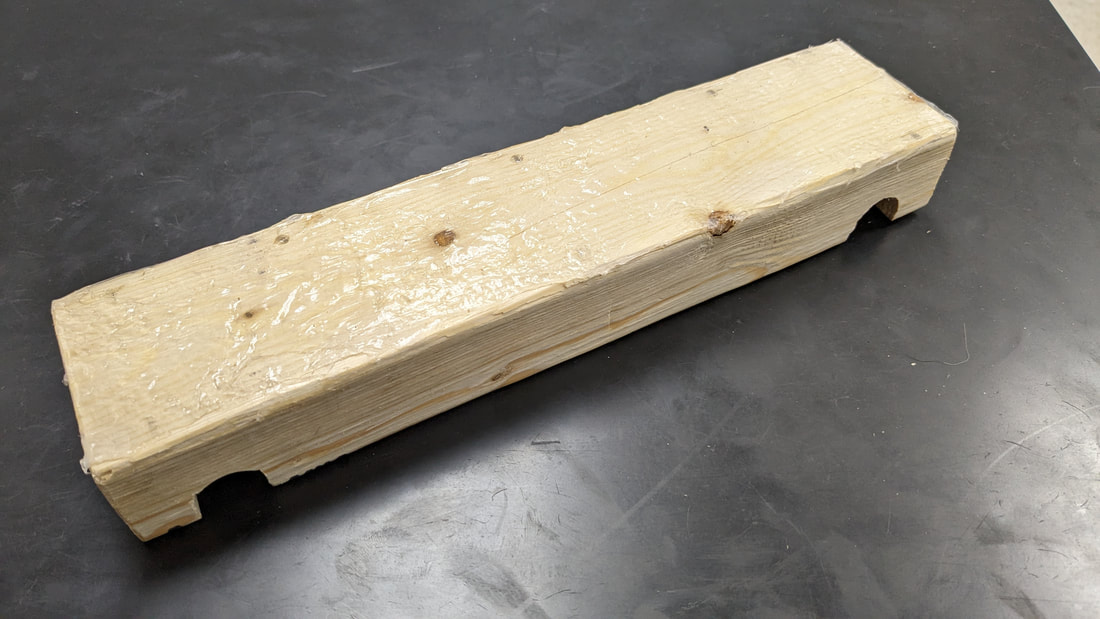
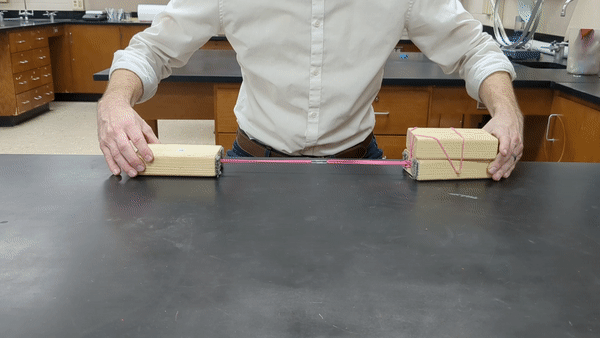
Even though both blocks experience the same force, the double block doesn't move as far because it is more massive (think back to Challenge #4). This is what we think back to when we talk about how gravity pulls on both a sky diver and the earth equally even though we only see one of these objects moving in any meaningful amount.

The Materials

The thing that I love best about this idea is that the materials are so simple and low-tech. There are lots of different set ups that would work just fine, so rather than put together specific step by step instructions, I'm going to lay out the general set up that I used and reasons for some of the modifications that I made to Bruce Yeany's original design.

The Blocks

Block set with base board
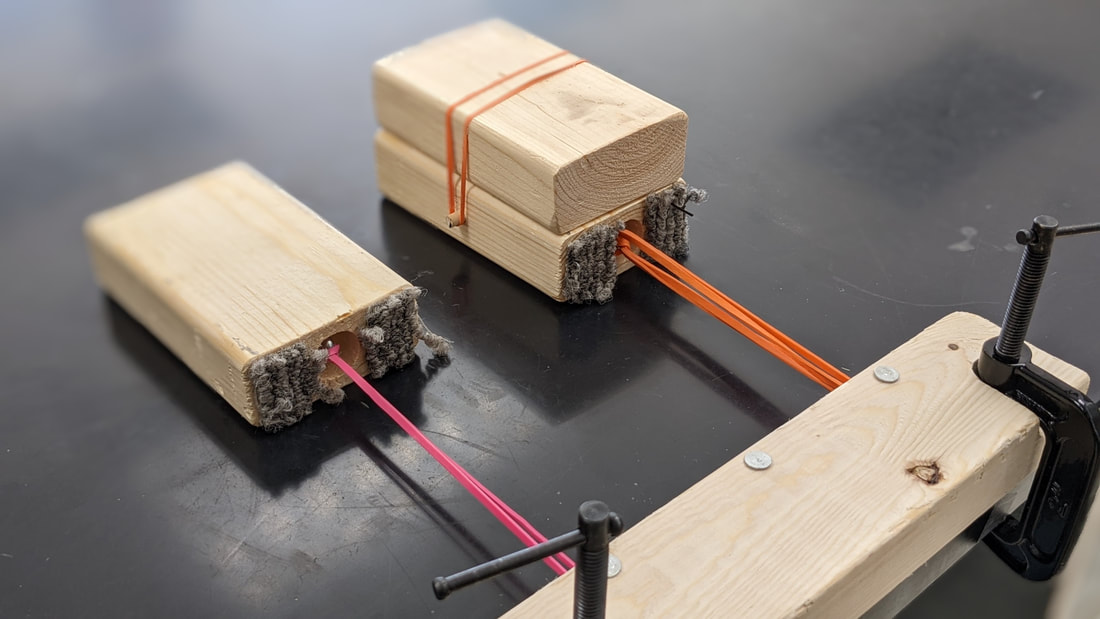
Each set up requires two blocks that can be connected with rubber bands to the base board. There are slight differences between the two but each one has same general design.

Dimensions
All of the blocks are made from scrap 2x4 lumber cut into 5.5-inch lengths and sanded to round the rough edges.

Lag Screw Eye
I drilled a recessed 3/4" hole into the end of each block and installed a 1/2" Lag Screw Eye into the center. I chose an eye screw because I didn't want the rubberbands falling off but after I had to replace my first set of broken rubber bands, I kind of wish that I would have just gone for recessed hooks here instead...

Collision Dampening
In my test run before giving these to students, it was clear that I was in for a splitting headache if I didn't do something about the noise. My solution was to get a free carpet sample from Menards and tape a couple of small square to the end of the blocks. If I were to make these again, I would probably go for something like a thick felt materials to avoid the unraveling carpet.

Block A

This block is used in the first two challenges requires the ability to secure a second block while allowing it to fly forward when it hits the base board. I accomplished this by cutting a short length (~2.5 inches) of scrap wood that I found that was 1/8" thick with a width of 1-1/4". I nailed this to the back of Block A so that it was loose enough to rotate into position but loose enough to still support the block. Make sure that it can fully tuck away when not in use in a position that doesn't impact the slide of the block.
Block with backboard down
Block with backboard up

Block B

This is the block that is designed to allow additional mass to be strapped on. I accomplished this by drilling holes in the sides and gluing in a 1" long segment of a dowel

In addition to the pegs, Block B needs to have 2 rubber bands connected to the lag screw to allow students to "double the force". This extra rubber band can be wrapped around the pegs when not in use.
Double block drawing

Extra Blocks

For each set up, I cut 3 extra 5.5-inch blocks from the 2x4 material. These blocks are used to demonstrate inertia or add mass for several of the challenges in the activity

The Base Board

The biggest modification that I made to Bruce's original design is in the base board. I knew that I wanted a set up that allowed students to constantly change the configuration to compare different variables, so I came up with pin system that didn't require the removal of the clamps.
Baseboard design
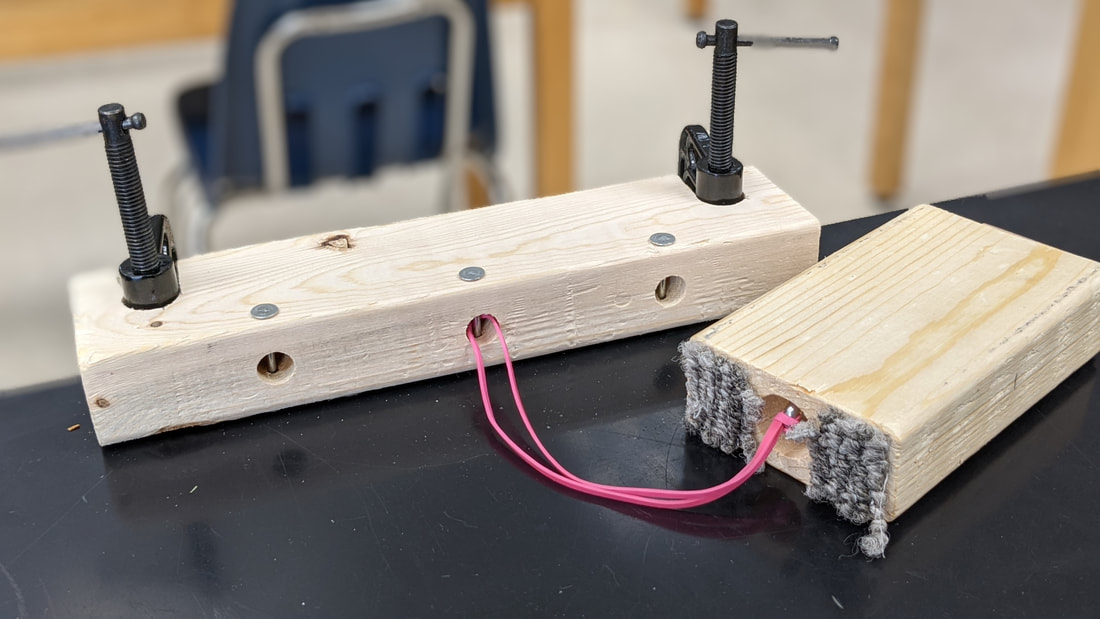
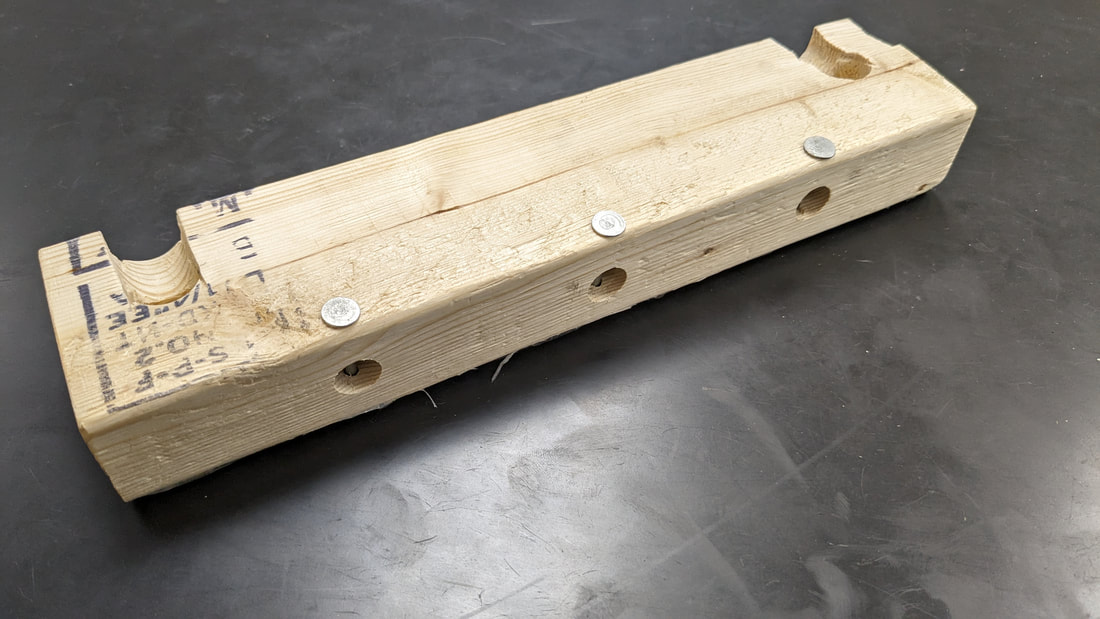
The base board is constructed from scrap 2x3 material that I found for really cheap in the discard bins at Menards. I cut the material into 11-inch lengths to allow for nice packing with the 5.5-inch blocks.
Baseboard pins
On the side of the board, I drilled three 1/2" holes around 1-inch deep with roughly equal spacing. Directly above these hole locations, I drilled three 1/8" holes offset 1/4" back from the edge of the board. These holes need to be large and deep enough to seat a 1-1/4" roofing nail.
With these holes drilled, I used a leftover box of roofing nails to capture pin the rubber bands in place.
1-1/4" Galvanized Roofing Nails
Picture
Animation of attaching rubber band to baseboard
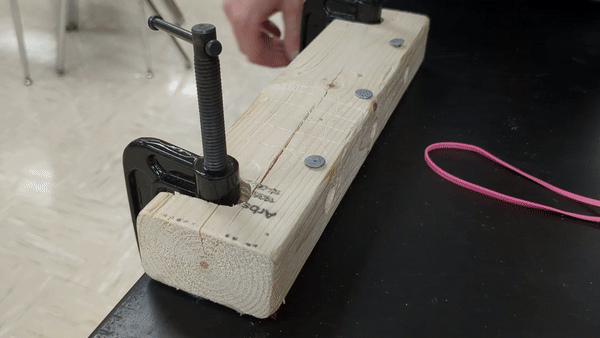
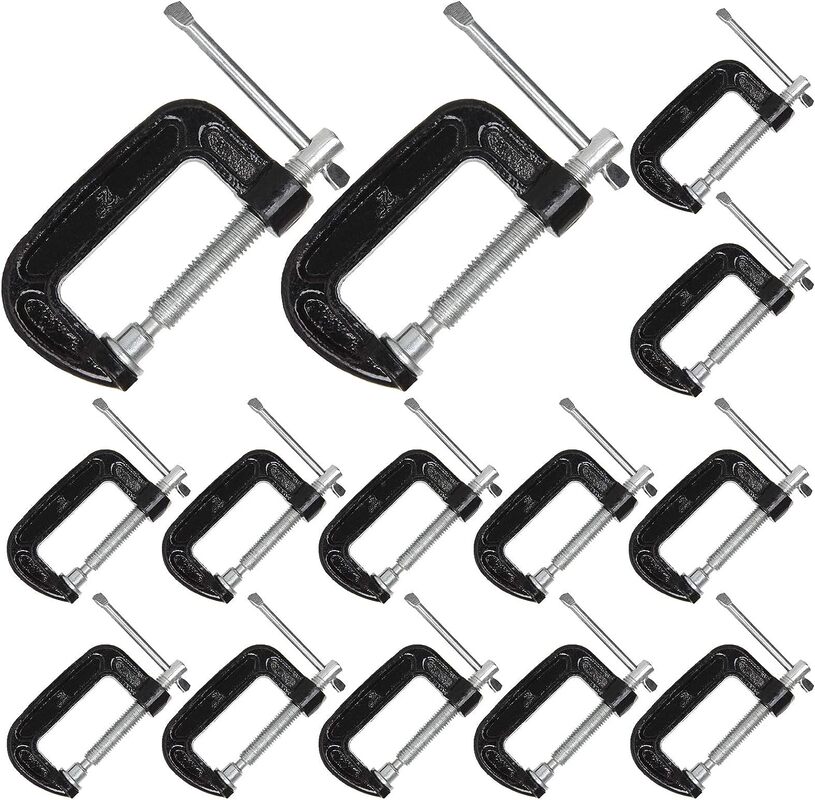
Obviously an important part of this whole design is clamping it securely to the table. I was trying to do this on a budget so I cut a notch out of the top of the board so that I could use smaller C-Clamps and still secure it to the edge of the lab benches in our classrooms. This allowed me to purchase a set of 14 2-inch C-Clamps from Amazon for under $30. With two clamps per set up, this was enough for the 6 sets that I made with a couple back ups. It would have been a lot less woodworking required to just get bigger clamps through so if you have the budget for it, it's probably work the time savings ;)
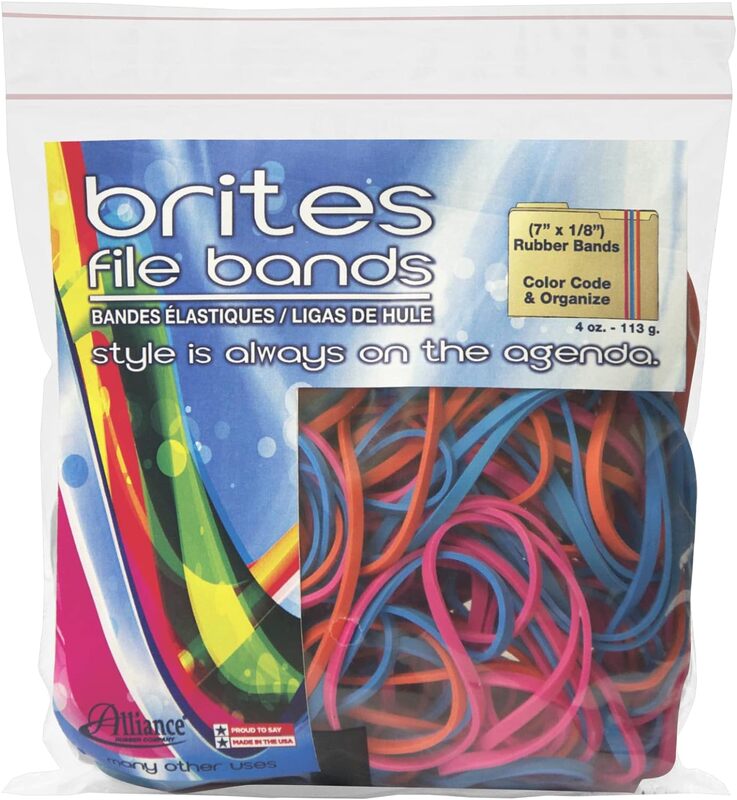
Picture
Amazon Link:
C-Clamp 2 Inch 14 Pieces G Clamp Set for Woodworking, Welding, and Building, 2 Inch Jaw Opening, Throat Depth 1-3/8 Inch
Animation of mounting baseboard with C-clamps
Even with the C-Clamps securely tightened, I found that repeated collisions still caused the base board to slide backward little by little. To fix this, I rubberized the bottom of the board with a layer of silicone caulk. This added a tackiness and provided a much more forgiving surface to clamp down. :)
Baseboard bottom

Rubber Bands

Unsurprisingly, rubber bands should really be thought of as a consumable for this lab. After a year worth of cycles, I typically need to plan on replacing each rubber band before I use them next time. My preferred rubber band for this set up are these file bands that I purchased from amazon. I found this 50-pack for ~$10.
Picture
Amazon Link:
Alliance Rubber 07800 Non-Latex Brites File Bands, Colored Elastic Bands, 50 Pack (7" x 1/8", Assorted Bright Colors in Resealable Bag),Blue/Orange/Pink

Whiteboard

My first year, I had students slide these blocks directly on the lab table and I ran into two small issues.
  1. There wasn't quite enough clearance over the base board for Challenge #2 to work without the top block getting hung up on the roofing nail sticking up.
  2. No matter how much I encouraged students to only pull back 50 cm with detailed instructions or marks on the table, the temptation to test the limits of the rubber band was just too much for some of my 9th grade boys ;)
I was able to solve both of these problems this year by placing a whiteboard upside down on the table once the base board was clamped down. This extra 1/8" of height was all the top block needed to sail over the base board and if you pulled back beyond the whiteboard, it just didn't work any more so it added a nice physical limitation.
Challenge #2 - Animated GIF

Material List

I made 6 sets of these Newton's Laws Blocks for my classroom so that I would have one for each lab bench. It's a pretty scalable project though so I will just list the materials needed for one set and you can scale as needed :)
Material
Amount
2x4 Lumber
3 feet ​(enough for 6 blocks)
1/2" Lag Screw Eye
2 (one for each block)
Block A Backboard wood (1/8" thick)
One 2.5" x 1.25" piece
2x3 Lumber
11" (base board)
C-Clamps
2
1-1/4" Roofing Nails
4 (plus extras)
Rubber Bands
4 (plus extras)
Silicone Caulk
1 tube (enough for all sets)

Reflection

Overall, I love this lab (especially for younger students like 9th grade or middle school). Students genuinely enjoy launching wooden blocks at other wooden blocks and I feel good about the fact that they are getting hands-on experience with the different aspects of Newton's Laws. Having these shared experiences as we continue on with our forces unit is a wonderful way to connect all of our discussions to something "real-world". This set of activities isn't an exhaustive list of things that can be demonstrated with these blocks and I would encourage you to check out Bruce Yeany's video if you haven't yet to get some more ideas.
I want to end with my favorite reveal of the lab, the fact that doubling the force along with the mass results in the same acceleration as the original 1 block / 1 rubber band set up. Soooo satisfying  :)
Blocks move together!

If you found this useful, you can find more lessons on the topic of "Forces" by clicking on the button below ​↓
Picture
Comments
comments powered by Disqus

    RSS Feed

    Picture

    Joe Cossette

    Father, Physics Teacher, Knowles Fellow, Friend, Techie, and Musician

    "Learning to teach teaches me to learn"


    Blog Posts

    • Finding a Habitable Exoplanet
    • Mechanics Super Problem
    • Binding Energy per Nucleon
    • Group Assessment
    • Newton's Law Blocks
    • Plotting the Stars
    • Periodic Aliens
    • Paper Rockets
    • Electronic Holiday Cards​
    • MCwordle Review
    • Bonding Sticker Practice
    • Kiss the Egg​
    • Friction Mini Labs
    • Free Fall Mini Labs
    • Energy Scramble
    • Cryptography Murder Mystery
    • Virtual Circuit Escape Room
    • Internal Resistance Lab
    • Electricity Mini Labs
    • AAPT Presentation
    • When Pigs Fly...
    • Light Mini Labs
    • Sound Mini Labs
    • Mechanics Lab Practical
    • Momentum Mini Labs
    • Energy Mini Labs
    • Mail Merge Assessments
    • Virtual Motion Matchmakers
    • Virtual Motion Escape Room
    • Motion Graph Scavenger Hunt
    • ​The Game of Science
    • Inquiry Cube - "Level Unknown"
    • Inquiry Cubes
    • Sound Wave Interference
    • Circuits Breakout
    • ​Chemical Reactions Crime Scene
    • Bonding Breakout
    • The Missing Piece
    • Groupwork Identity
    • Cup Stack Challenge
    • The Floating Balloon
    • Stop Motion Face Off
    • Motion Graphs Practice
    • Google Form Scavenger Hunt
    • Motion Graph Matchmakers
    • Printable Periodic Table
    • Circuits Scavenger Hunt
    • Energy Scavenger Hunt
    • 1000/24/7 Lectures
    • Up-Goer Five Reports
    • Actionable Norms
    • Writing a Breakout Task
    • Excel on the iPad
    • Excel: Solving with Formulas
    • Excel: Graphing from Data
    • Graphing Lab Data
    • Excel Skills Assessment
    • Energy Breakout​
    • Physics Content Guides
    • Build your own Breakout Kits
    • Building by Design
    • Engineering Communication
    • Google Doc Scavenger Hunt
    • Reflecting on Identity
    • Kinematics Crime Scene
    • Message to the Graduating Class
    • Projectile Murder Mystery
    • Beats by __________
    • The Uncertainty Game Show
    • Data Validation in Google Forms
    • Podcasts
    • Inquiry Cubes

Powered by Create your own unique website with customizable templates.