Update: Since I first posted this resource in May 2022, I have become of aware of several inconsistencies with the original data and decided to make some updates in a Version 3.0!! I'm excited to share this activity with data that more accurately resembles accepted data. :)
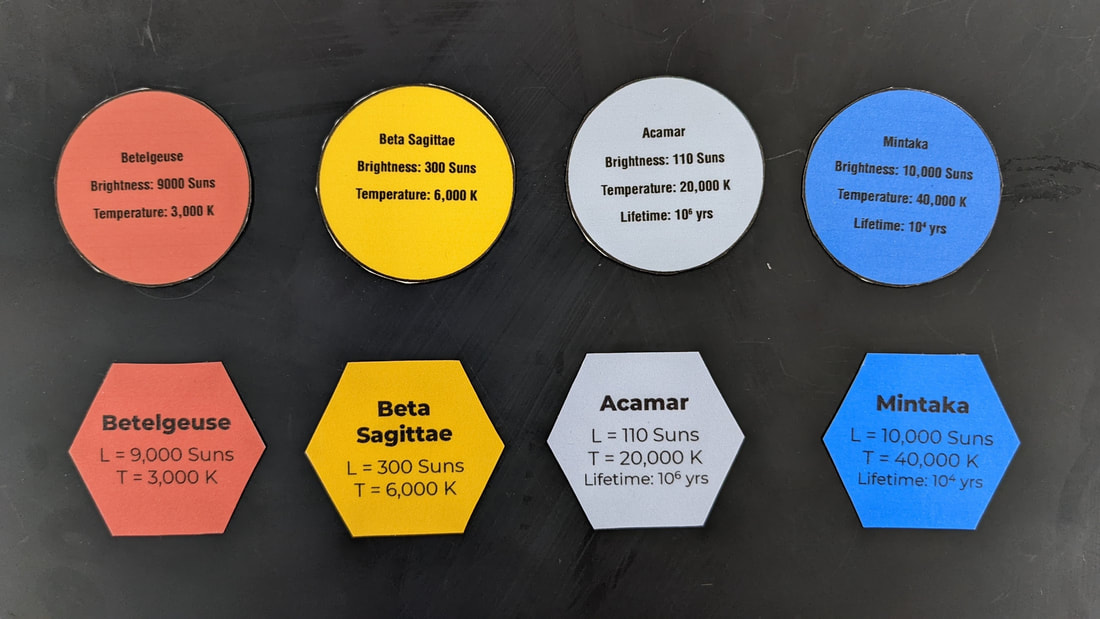
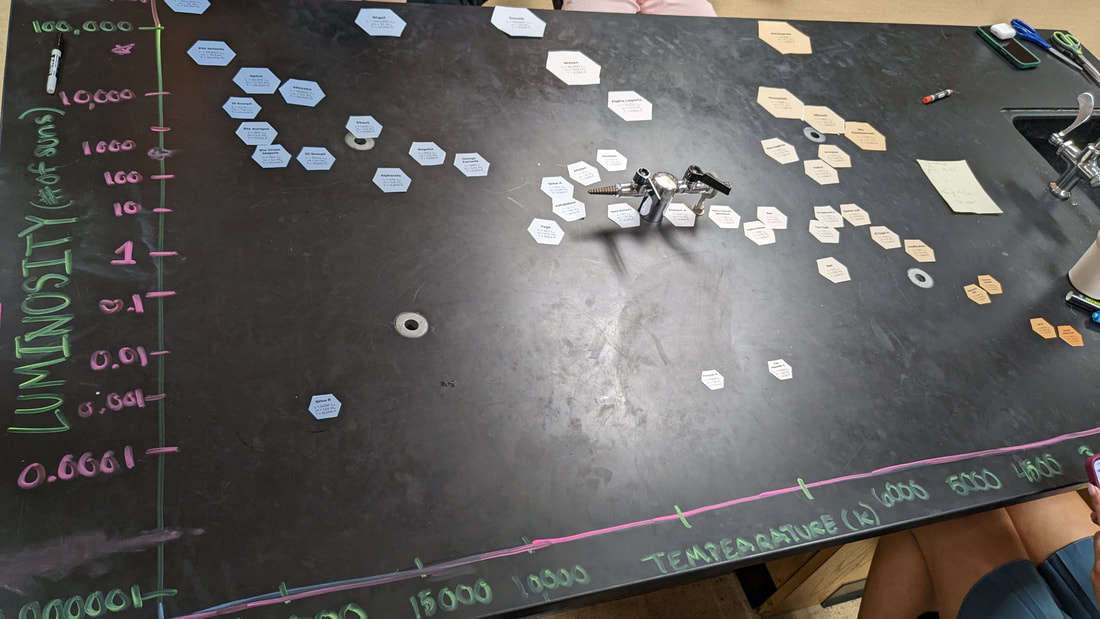
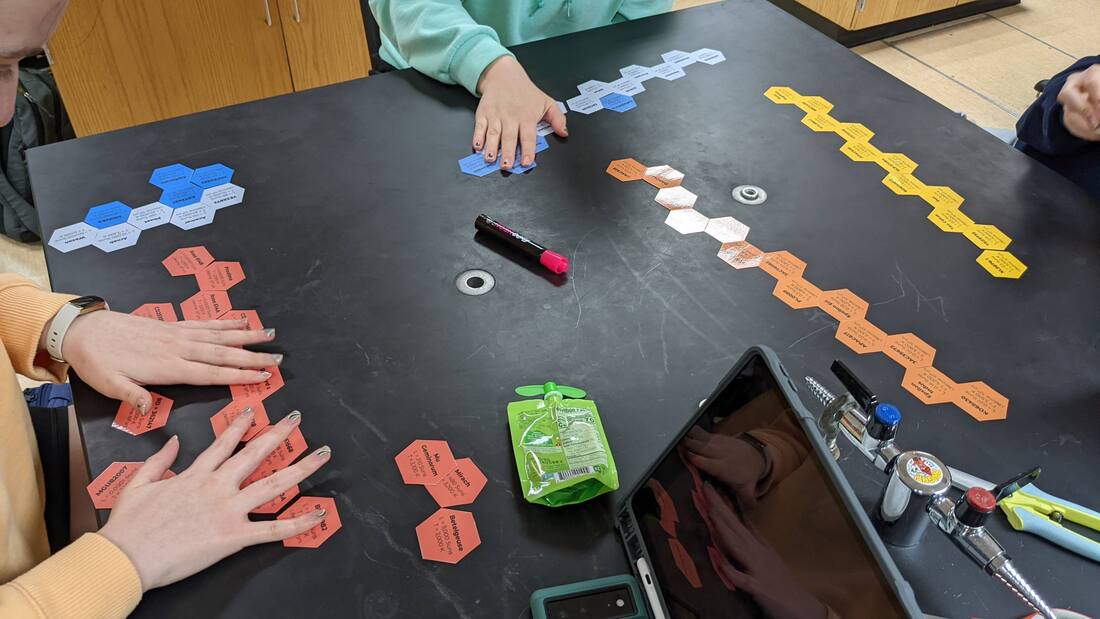
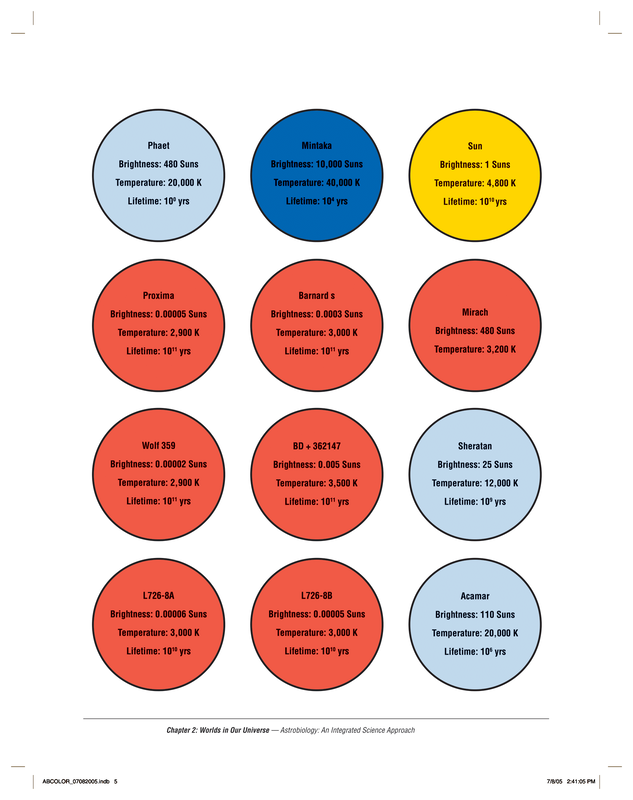
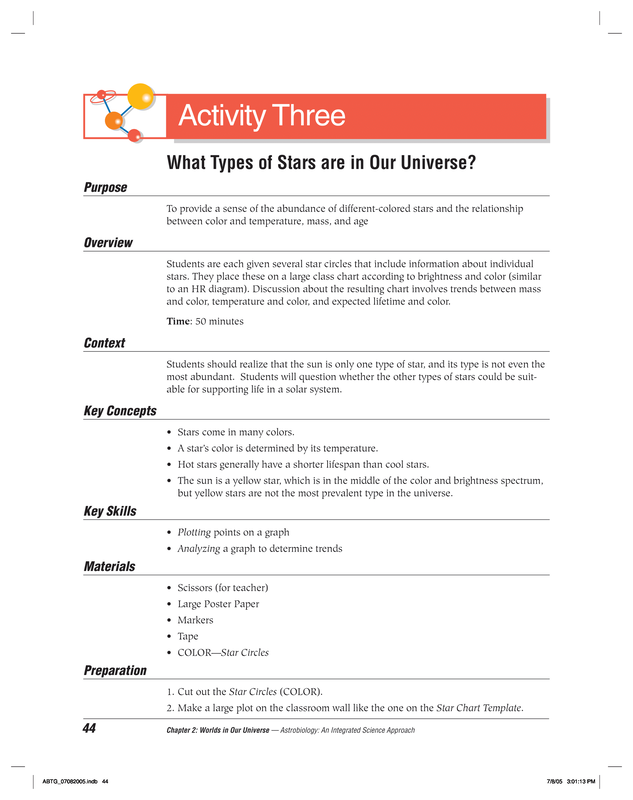
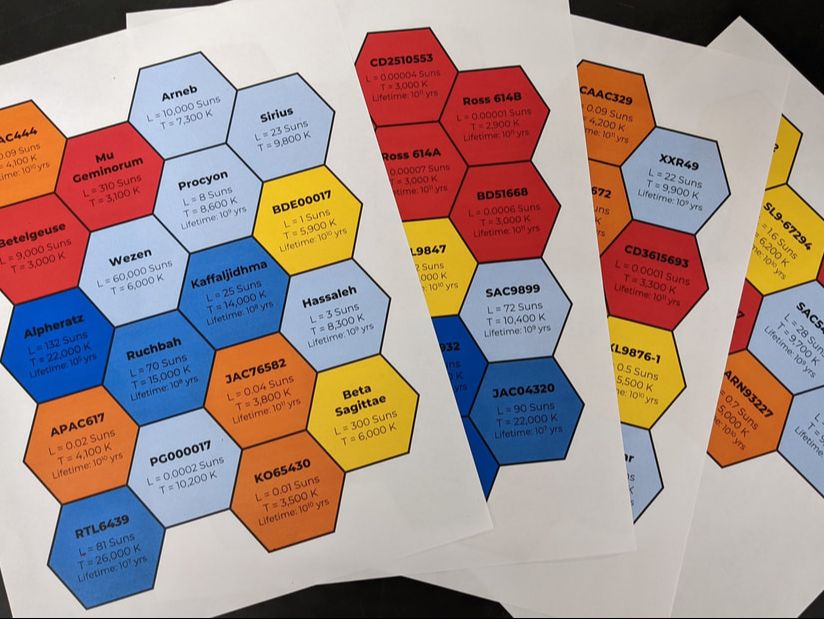
The TaskWhen I do this in my class, I give a set of star cards to each group and instruct them to "organize the stars and look for patterns". Different groups did this in different ways, usually starting with colors and then sorting each group by their luminosity or temperature.
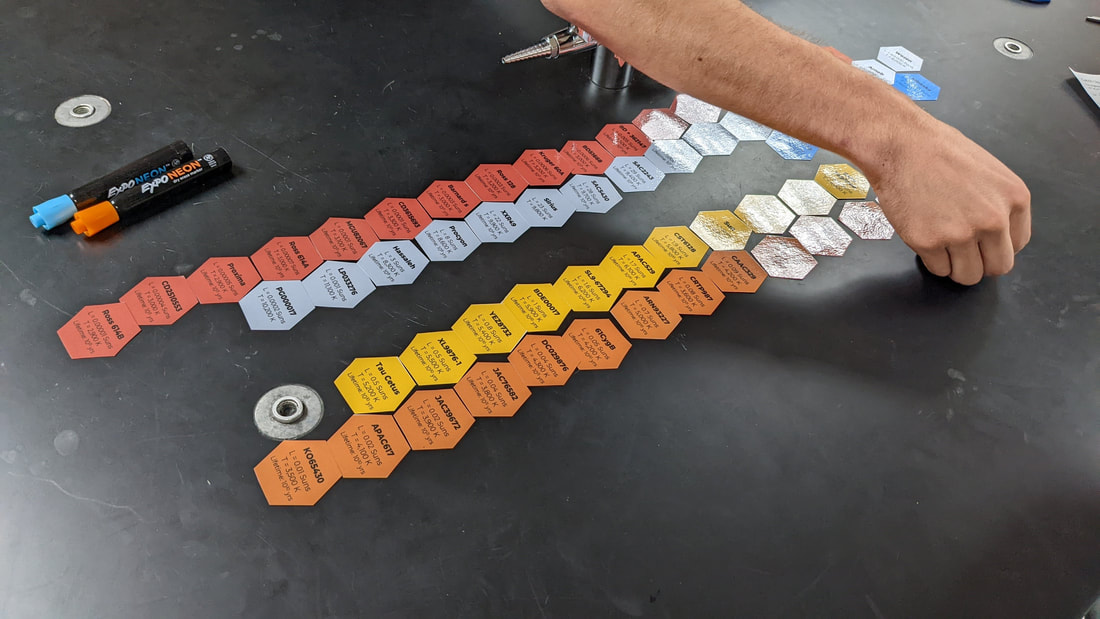
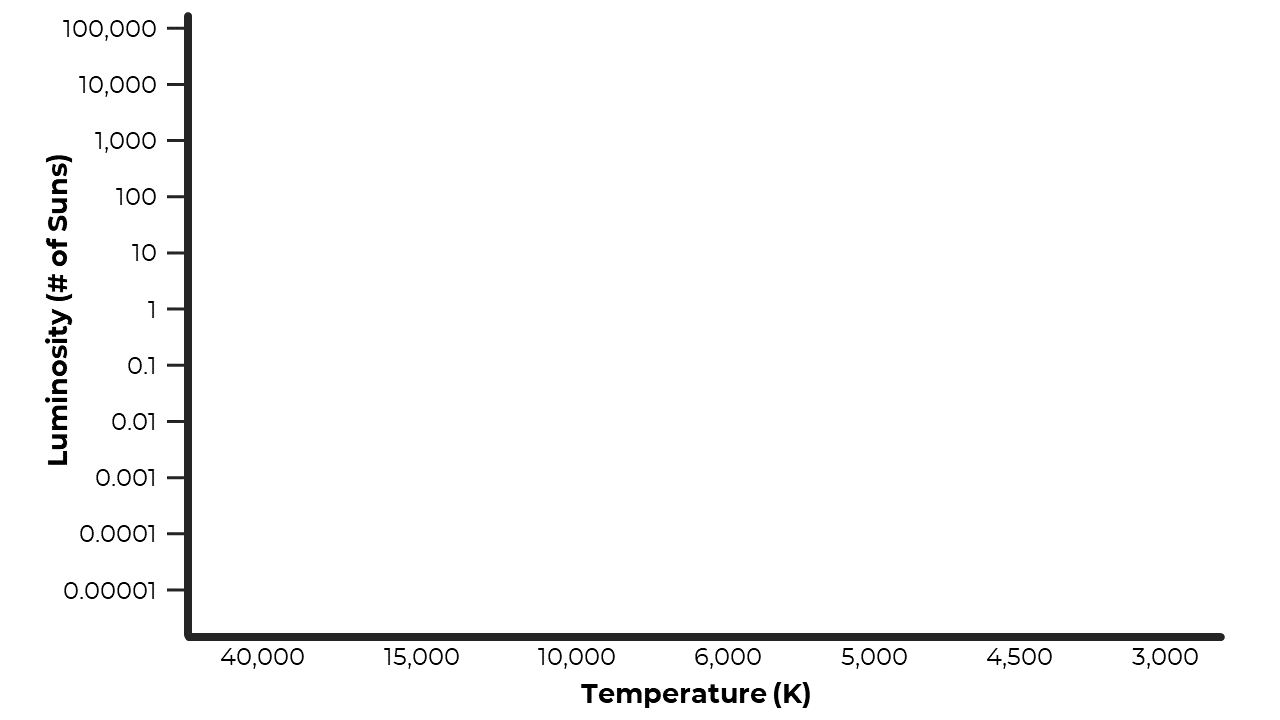
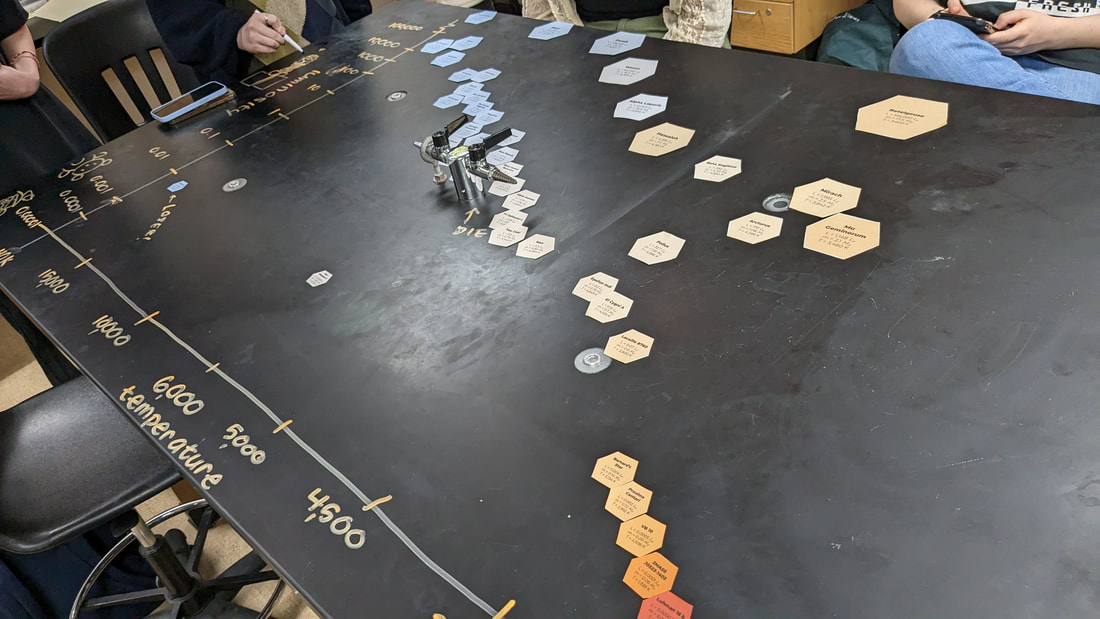
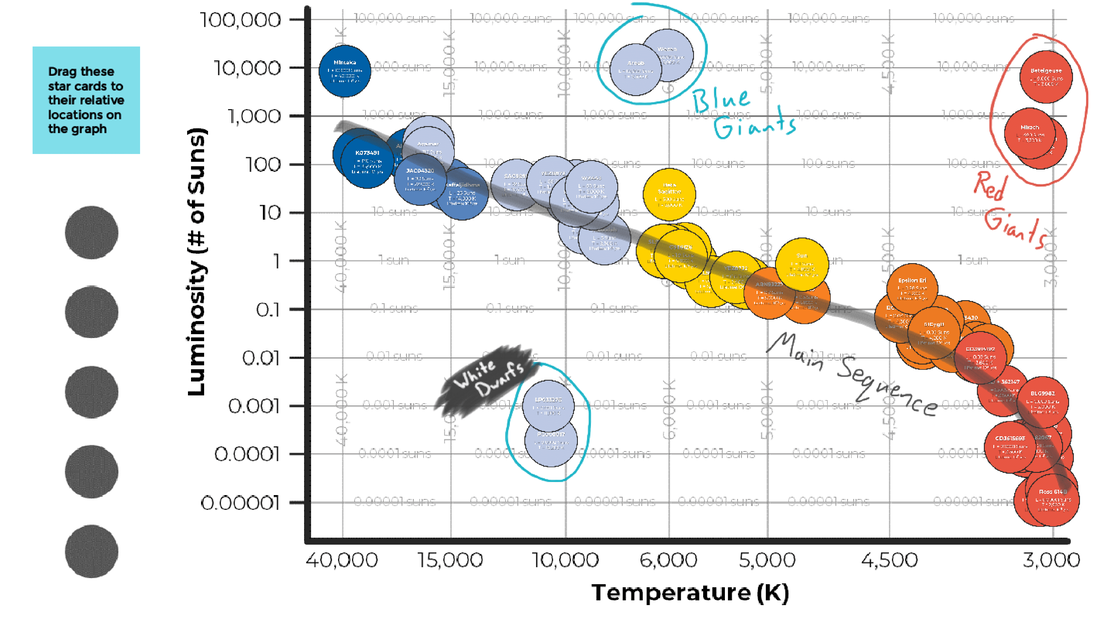
After they have had a chance to explore the stars a little bit, I ask them about patterns that they've noticed. They should notice that the colors map really closely to the temperature but don't necessarily predict the luminosity. For example all the red stars are around 3,000 K but their luminosity could range from 0.0001 suns (red dwarf) to 9,000 suns (red supergiant). Because of this, it is useful to organize these stars in two-dimensions and plot them on a graph
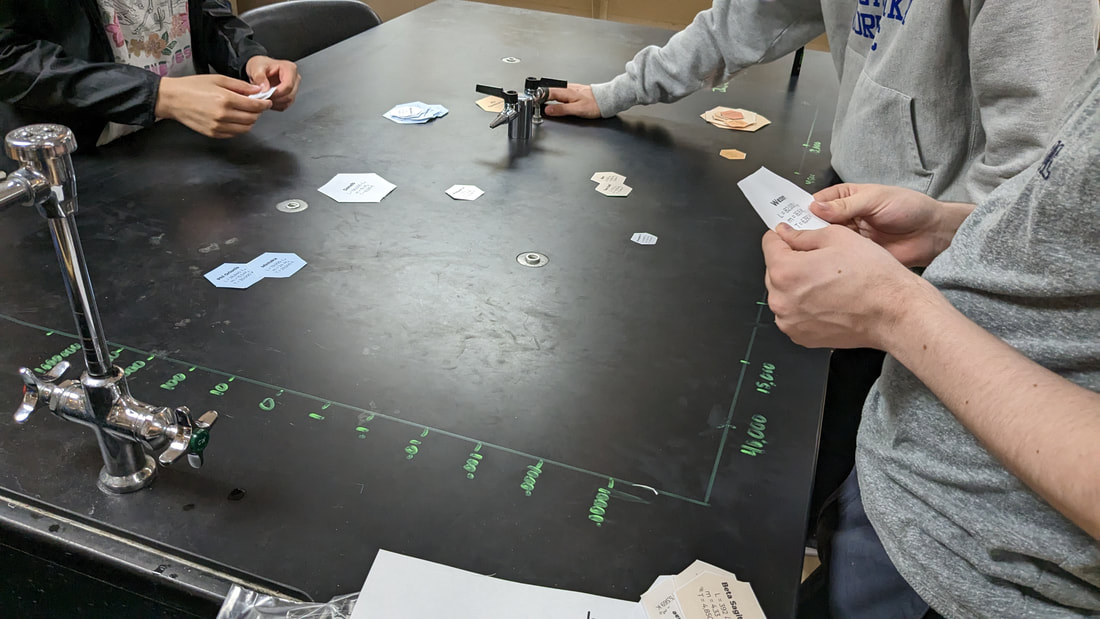
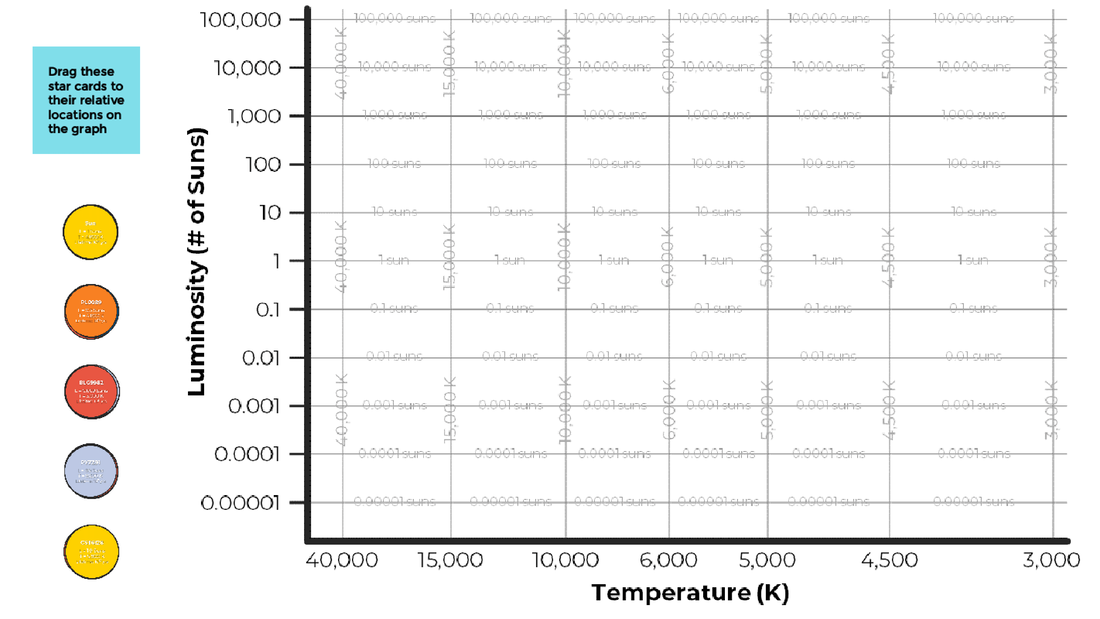
Since a typical H-R Diagram has a unique log scale and inverted temperature axis, I provide students with a template that they should use to set up and label their axes. This year, I just projected this blank example on the board and students transferred it to their lab benches using neon markers. I have also done this poster boards and with magnetic star cards on the front whiteboard but I liked this individual tabletop method the best. :)
Original Files
Version 2.0
Modification HistoryI've liked the task enough to use it for several years but there were a couple of things that I always wished were a little different and I finally took the time to make the updates that I've wanted. Updates made from the original to Version 2.0:
 After sharing version 2.0, several teachers reached out noticing that some of the stars were incorrect temperature, color, or both! In my first iteration, I never double checked the data from the original resource but now I was on a mission to make a version 3.0! Updates made from Version 2.0 to Version 3.0:
Virtual VersionUpdate: since Google has announced that they will be phasing out Jamboard in 2024. I have not updated this next section to Version 3.0. That said, I'll leave it up here on the blog for now for anyone that would like this option while it still exists... If you aren't able to print/cut enough cards or want to allow participation in an online setting, I've also created a Jamboard template to run this activity virtually. Noticing that students really needed to zoom in to read the star properties, I added gridlines with extra labels to the axes so that student didn't lose their bearings ;) The link below will force a copy of the Jamboard that I put together as a virtual version of this task. You can either modify this and share with students or give them this link for them to create their own copy and share it with the rest of their group. Downloadable FilesHere are the files one more time that you can modify, print, and use in your classroom. Let me know if you have any questions or ideas for this task.
Click for more Astrophysics resources ⬇
Comments
I always start talking about the periodic table through exercises focusing on pattern finding. This Periodic Aliens activity was created by John Bergmann and Jeff Christopherson and is beautifully captured in this powerpoint presentation that has been floating around the internet. In an effort to make sure that it was preserved and also make a few tweaks of my own to make it more customizable (and virtual if needed) I rebuilt the activity. The activity is largely unchanged though so they get all the credit for how awesome this task is. :) 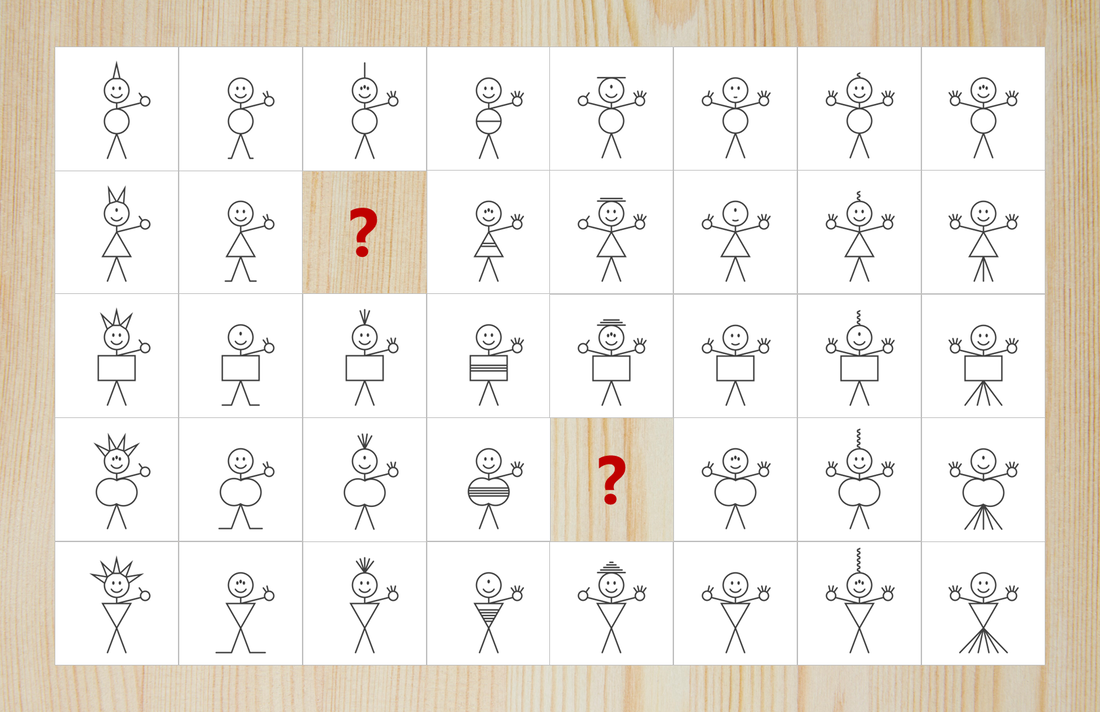 The Challenge
If students are confused about how it can be possible to figure out the identity of cards that they have never seen, I find the following analogy useful:
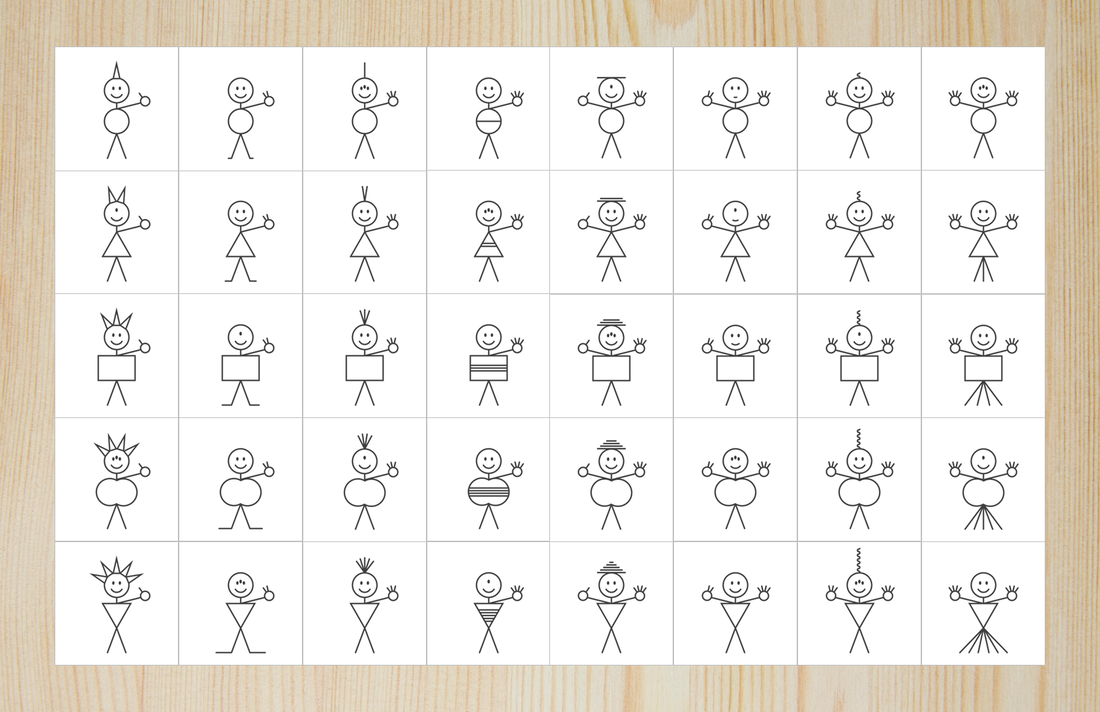
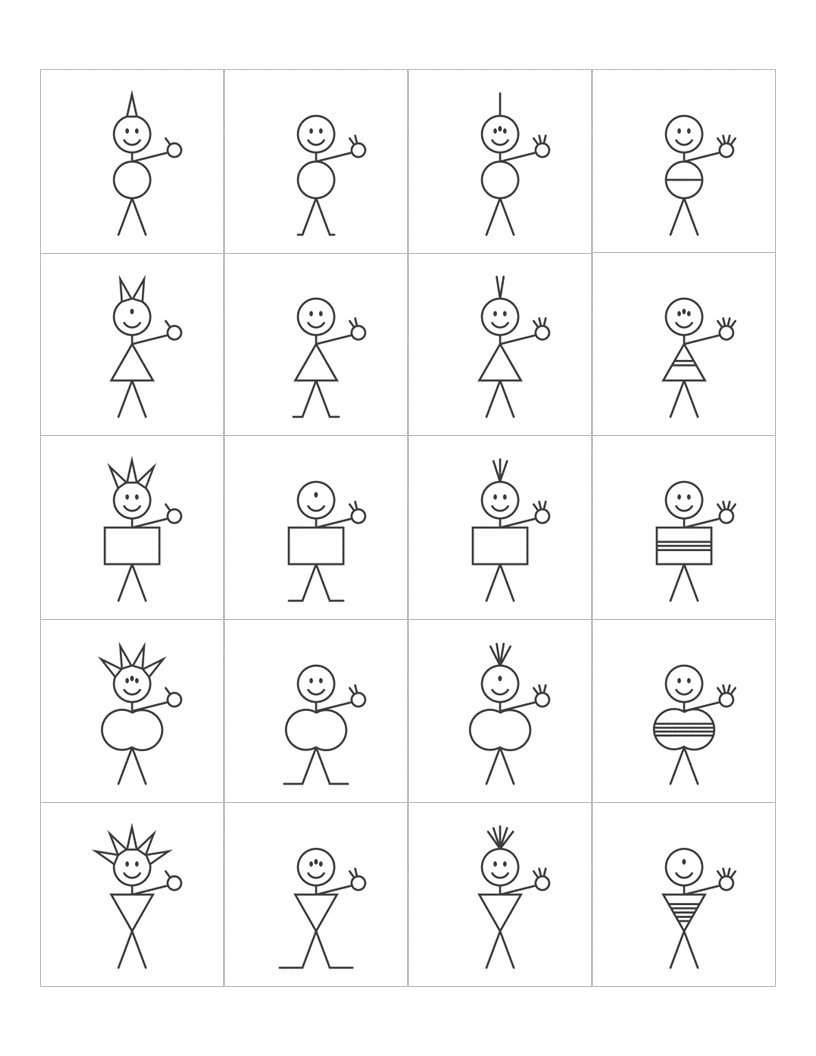
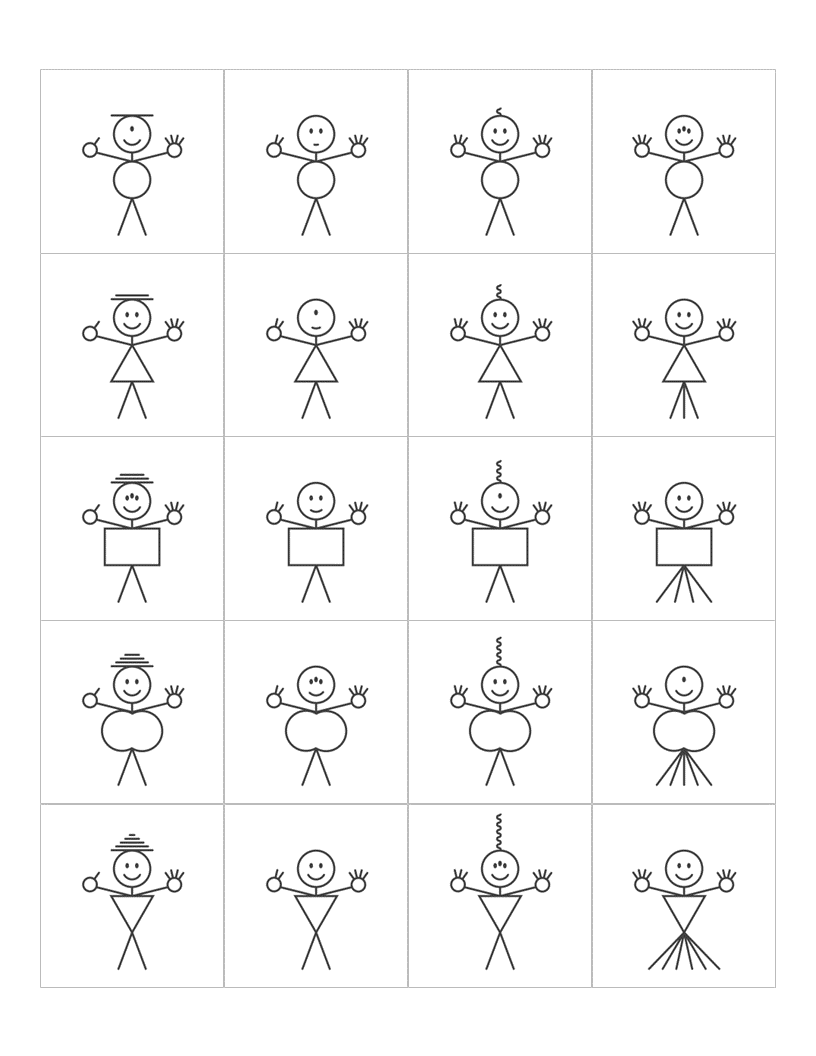
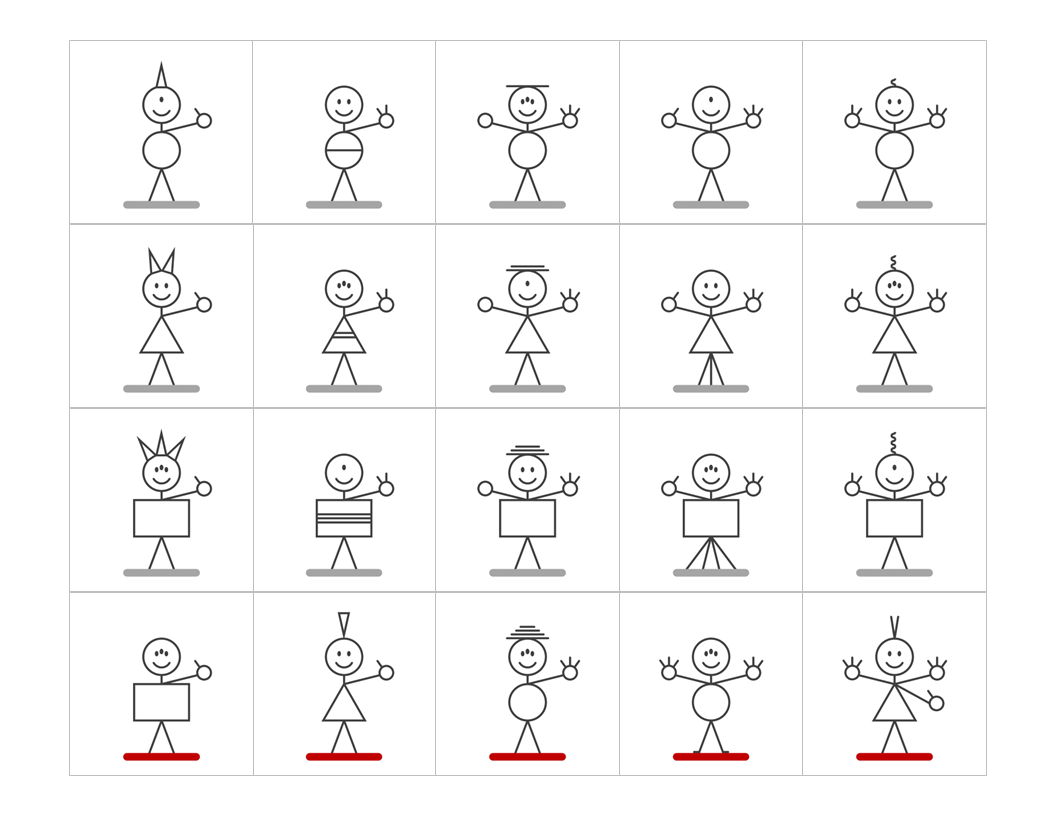
The Alien DeckIn recreating the original activity, I wanted to clean up the original images a little bit and make them editable in case I ever wanted to add new designs to the same general alien shape. In the process, I ended up making two versions, one with 40 cards and one with 15 cards. The original intent of the smaller deck was to make it a less cluttered version to use online (see the jamboard at the end of this post) but I could also see a scenario where a shorter version of this activity could be useful.
Set UpTo prep this activity, you will want to print and cut a set of cards for each group. They are arranged in their grid in this file so if you want to put the students to work and have them cut them out, make sure you print out the "scrambled" version so it doesn't give away the patten :)
Activity VariationsThere are several ways that you can use these cards in class. I typically do a combination of #2 and #3 and I use the extra challenges to keep groups engaged until the very end of the activity since students will get through this task at very different speeds. Activity #1 - Organize the Aliens Provide all groups with the entire deck of cards and ask them to organize the cards into a grid with patterns/groupings that appear in both the vertical and horizontal directions
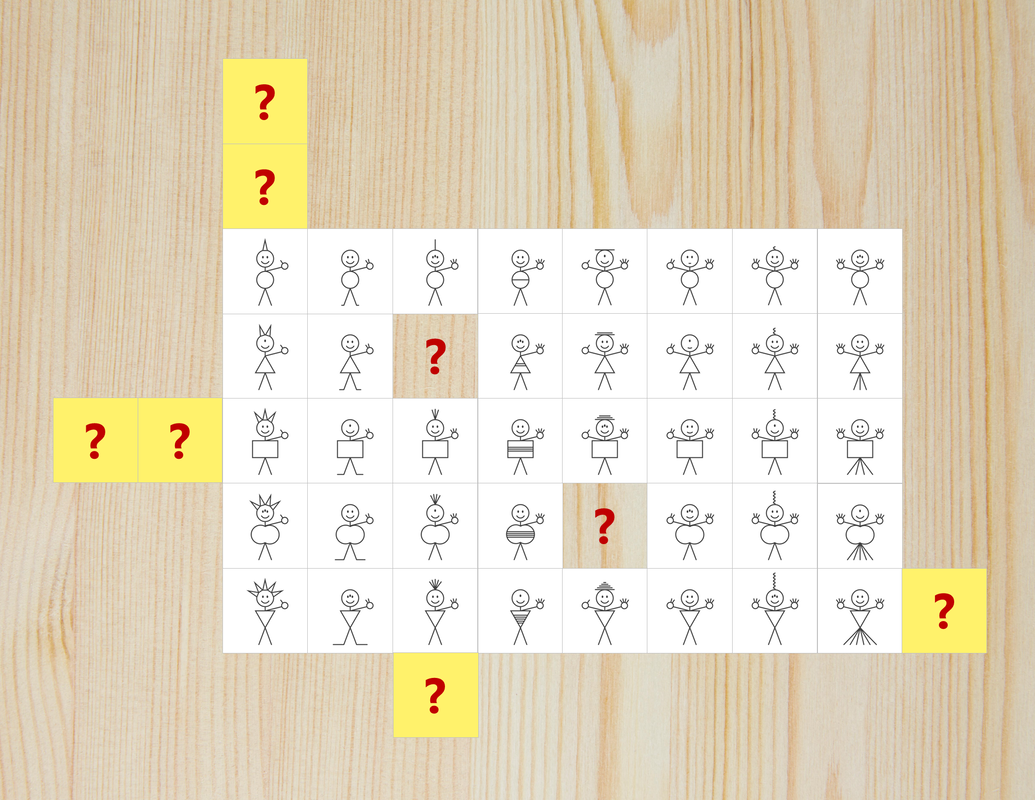
For the 15 card variation, I have included a set of 5 bonus cards that students can try to place around their 3x5 grid in locations that maintain the existing patterns in their organizational structure. These cards have a red line to make it easier to pull them out if needed. 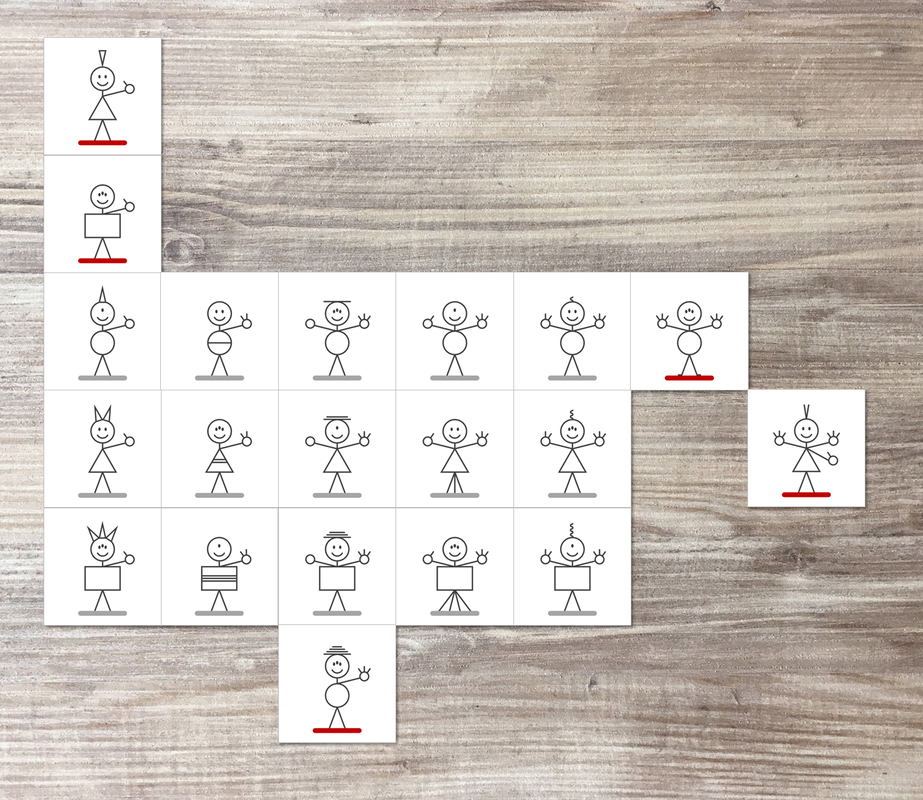 How it EndsWhen I do this activity, I don't have anything for students to submit to me. Instead, they call me over when they are ready to get their prediction checked. My ultimate goal is that every group has an opportunity to solve the puzzle so I will provide extra tasks for any groups that get done early. By the end, some groups will have several post-its with "newly discovered" aliens while others will have just finished predicting the two that were missing from the beginning. SolutionsThere are a bunch of different patterns to be found! Here are patterns that I had in mind with the grid organization shown. These aren't the only way to think about it but it can be helpful to have a picture when walking around and observing. 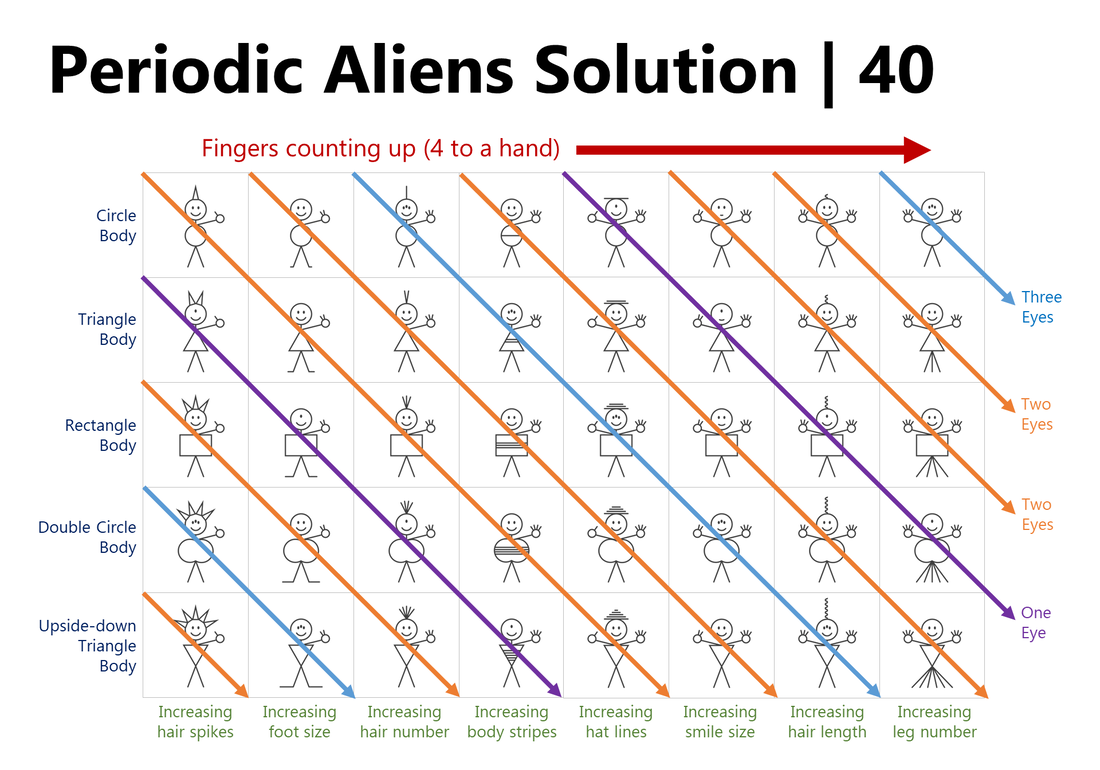 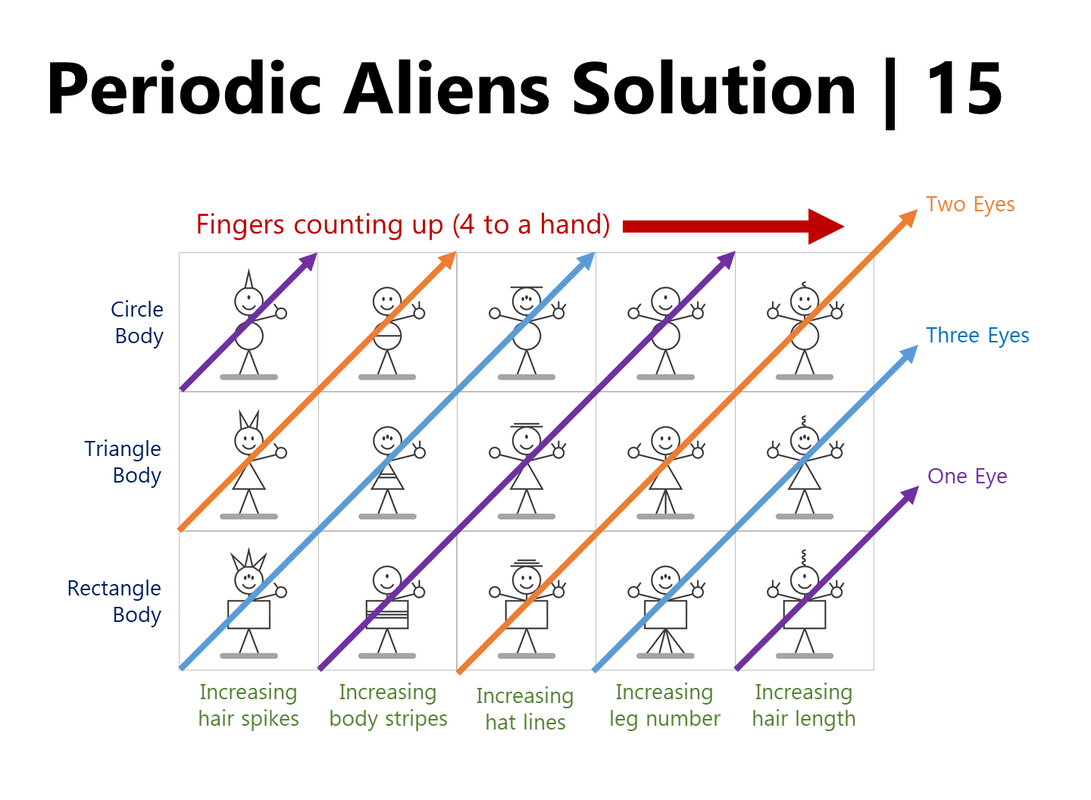 Virtual Aliens!Part of my motivation for updating this activity was to make it easier to do online during our COVID e-learning years. We used jamboard so that groups could manipulate the aliens in a shared space and also draw in what they thought the missing ones should look like. The links below should force a copy of the jamboard so you can play around or share with students. 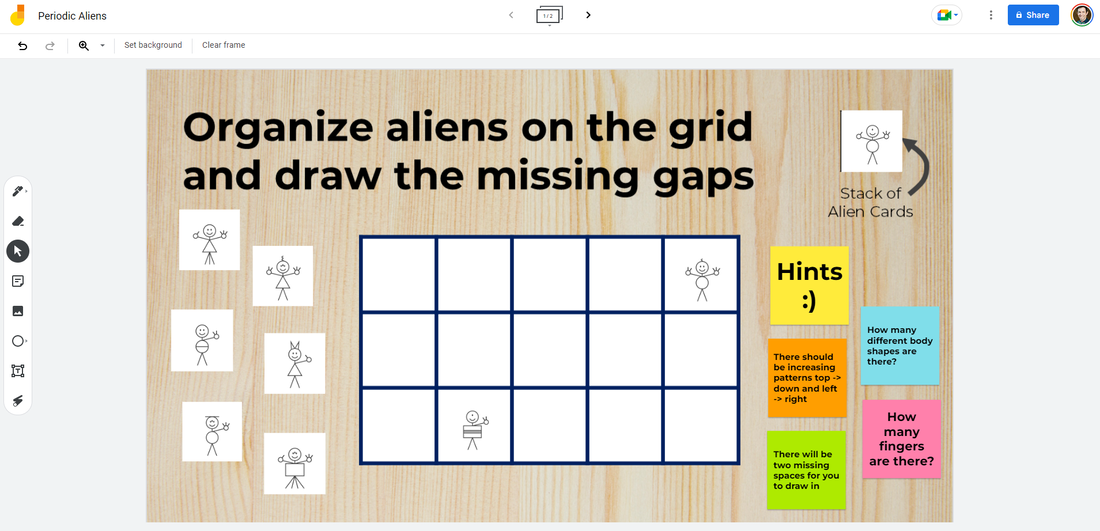
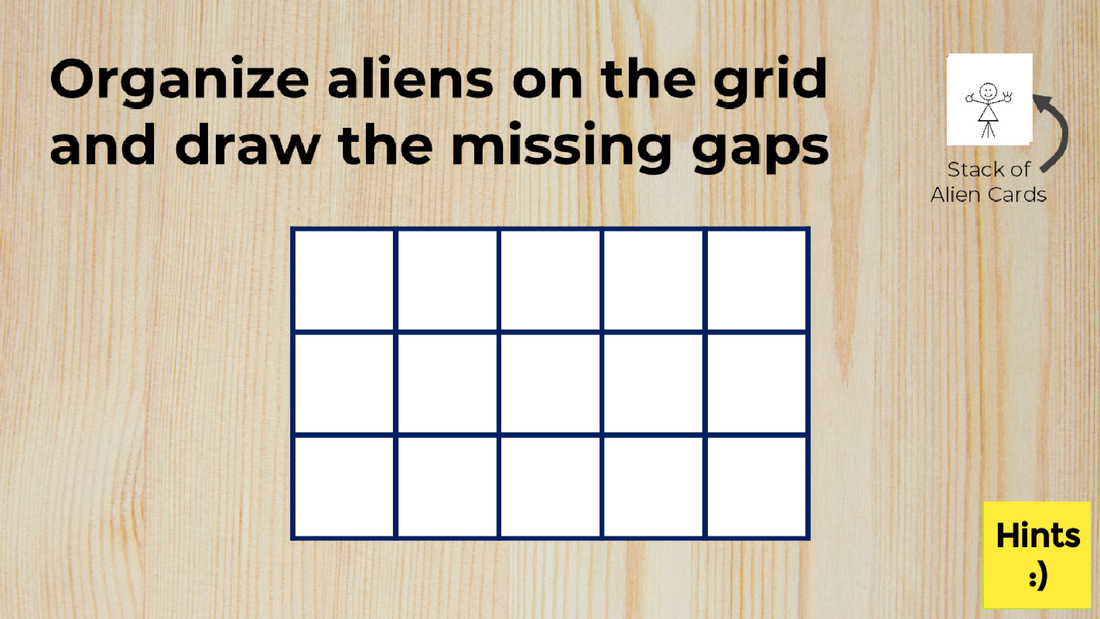
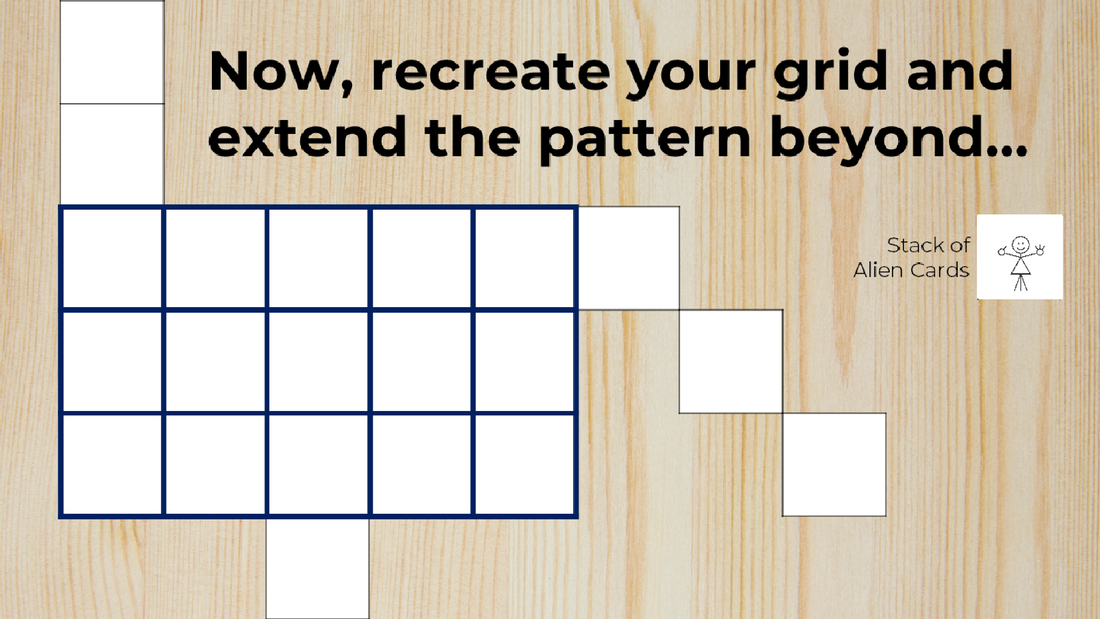
Since this is all on a screen, I opted for 15 cards because I didn't want it to get too cluttered. I also built in some hints on a stack of post-its in the bottom right corner that students can opt-in if they want some extra help. If they complete the first challenge, there is a second screen that includes blanks outside of the grid for them to extend their pattens into :)
Connecting it to Science
In this activity, students get to take an incomplete set and find patterns that allow them to "discover" aliens that they never got access to in the first place. Basically, they become the Mendeleev of these random stick figure aliens that they've never seen before! ;) FilesI've tried to include all of the files that I think could be useful to run or modify this activity. If you have any questions or requests, please leave a comment below! Cards to Print - sets of cards ready to print and cut
Grids - one page layouts
Solutions
Editable Alien Drawings
Click for more Periodic Table resources ⬇
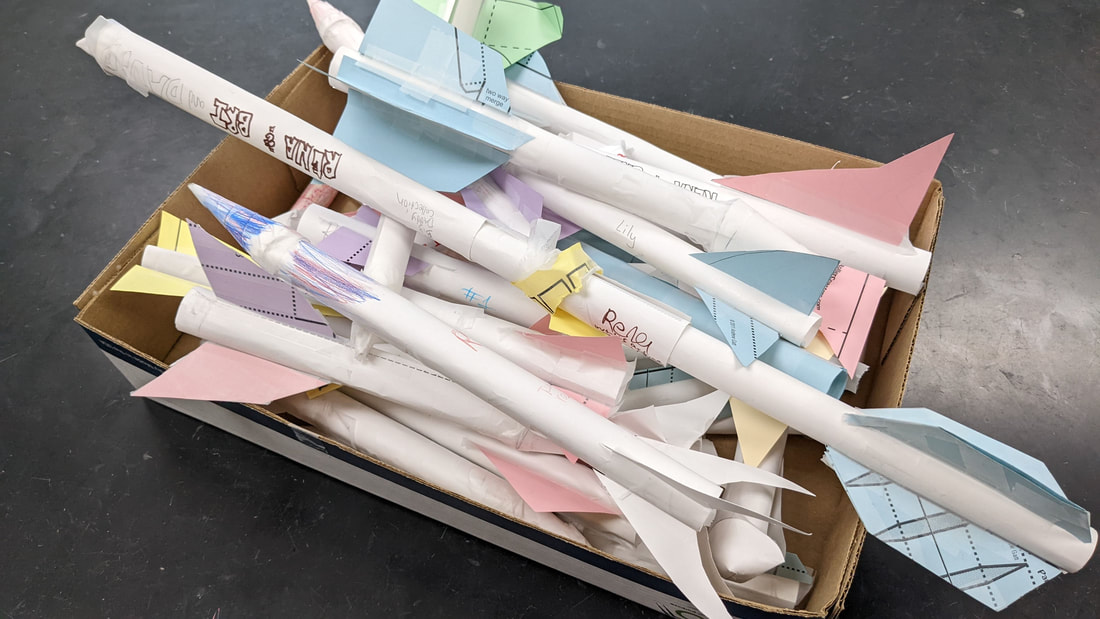
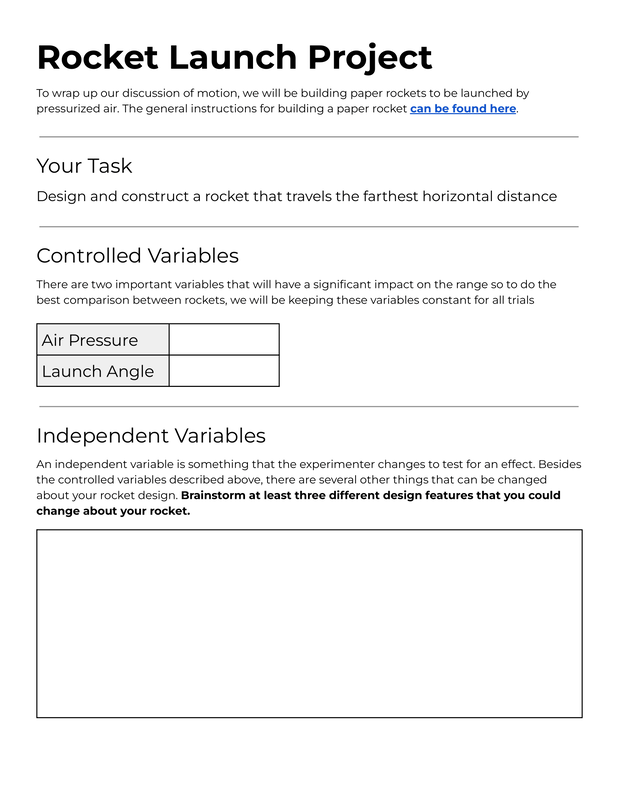
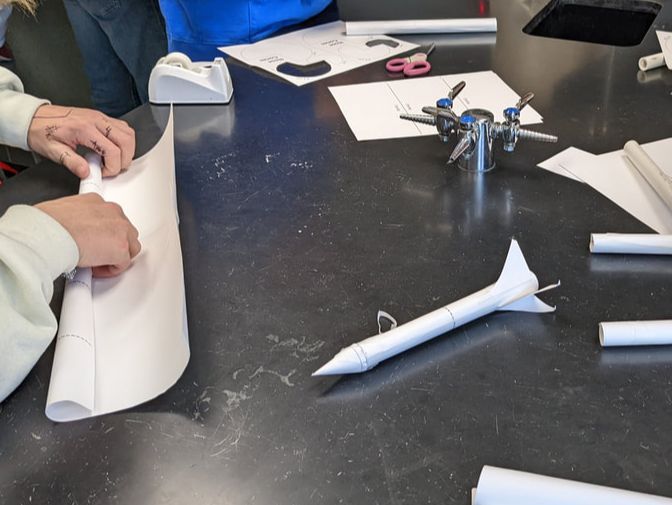
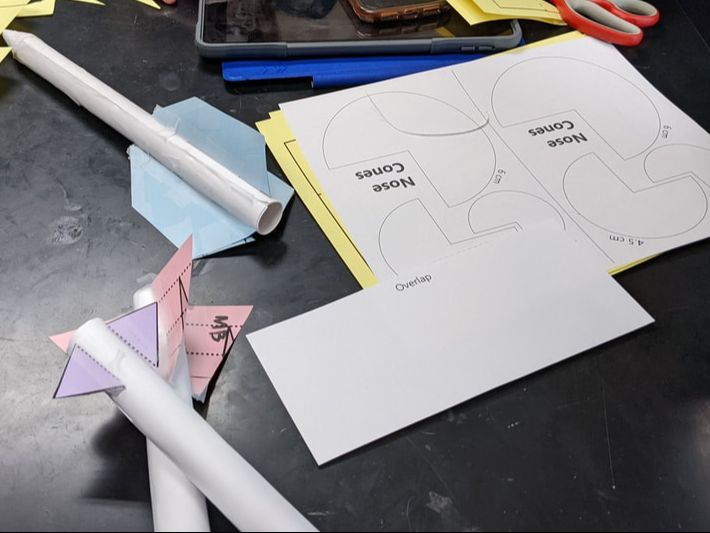
OverviewThe goal of this project is to design and build a paper rocket that travels the furthest horizontal distance when launched at a predetermined angle and air pressure.
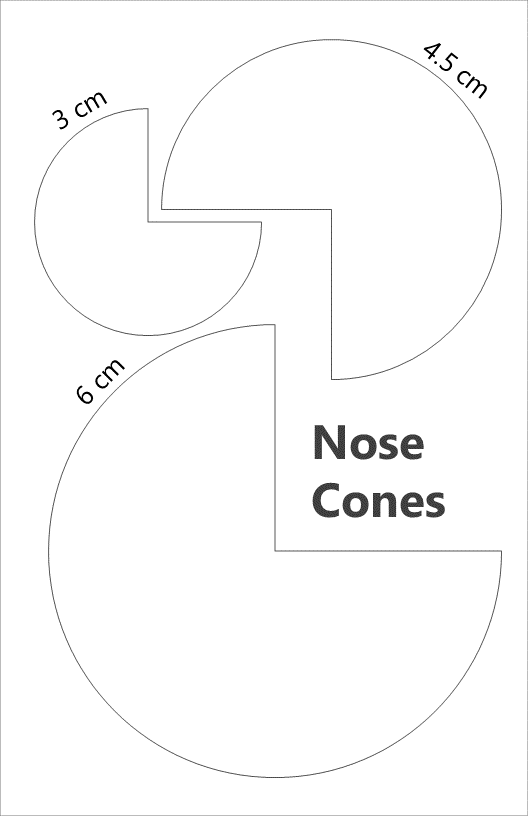
Designing RocketsWith the launch angle and pressure fixed, the variables that are left are all related to the rocket's design. After showing students my sub-par example rocket, I had students work with a partner to come up with a list of variables that they could experiment with. Some examples of variables that students experimented with are included below. Independent Variables
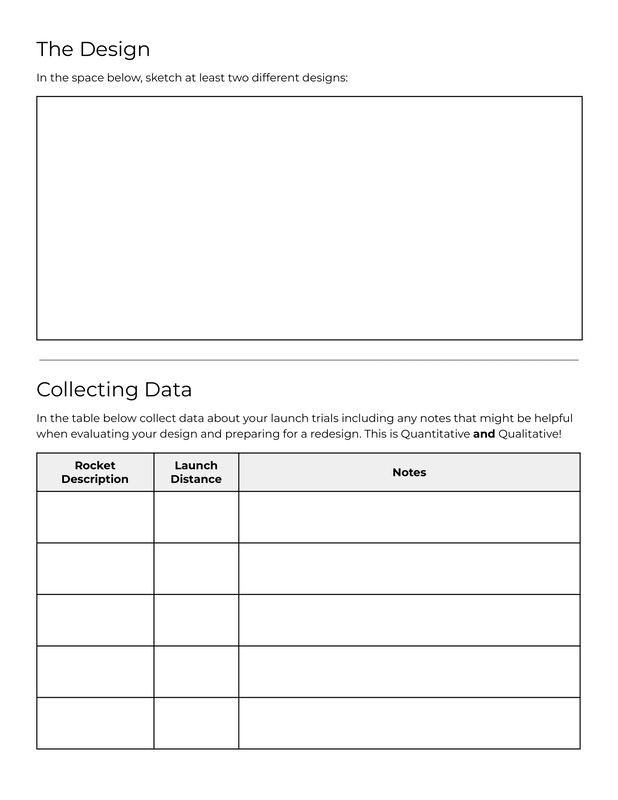
Before the first test launch, I encouraged students to create two different rockets where they played with just one of the variables that they brainstormed. For example, create one long rocket and one short rocket where the nose cone and fins were identical. I gave my students an option to work with one other person if they wanted so most groups of two just had each person build one rocket for the first launch. Building RocketsMy favorite part about this project is that it is iterative and students can go through the design/test cycle many times to learn from experience and trial and error how to make the best rocket. There are a few different tips that we learned along the way to help all students find success overall so they could focus on the design variables that they were testing.
Toss to Test for Flight Stability Even without the launcher, students discovered that they could get a feel for how stable their rockets flight was going to be by simply stepping into the hallway and tossing their rocket by hand like a paper airplane. If it can't fly straight at low speeds like this, it will definitely twist and turn when blasted off with 60+ psi. This an easy way for students to make quick adjustments without too many official trials.
Overall, I was very pleased with how cheap the materials ended up being for this project. Even when scaled up to 700 ninth graders, aside from the launcher itself, we only needed paper and tape so it hardly made a dent in our department budget for the year. We opted for cardstock to make the rockets a little bit more durable but you can get regular paper to work as well for this project if needed.
The Final Launch
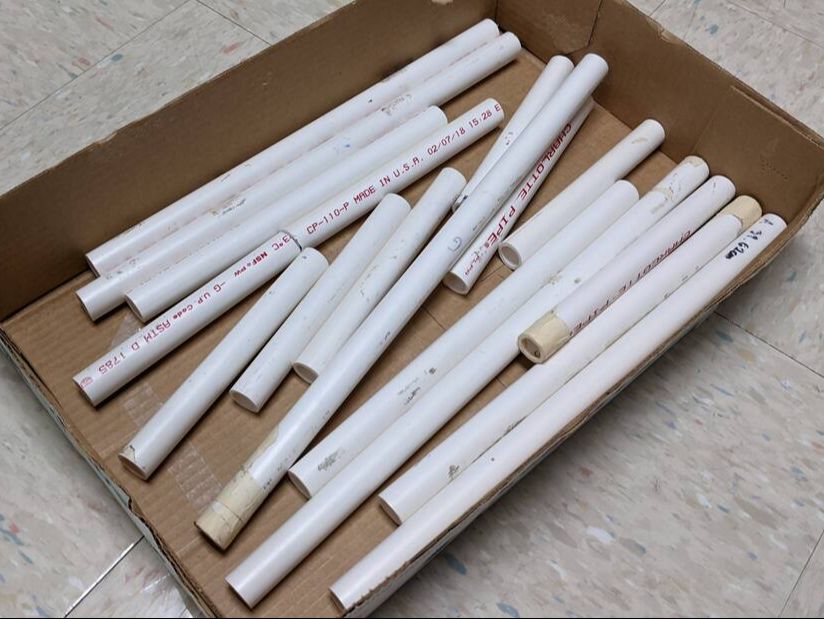
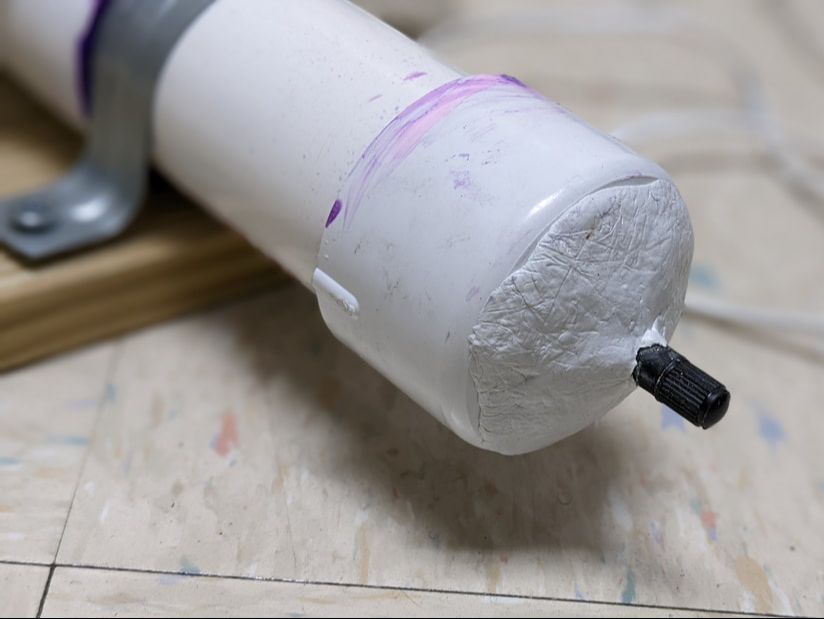
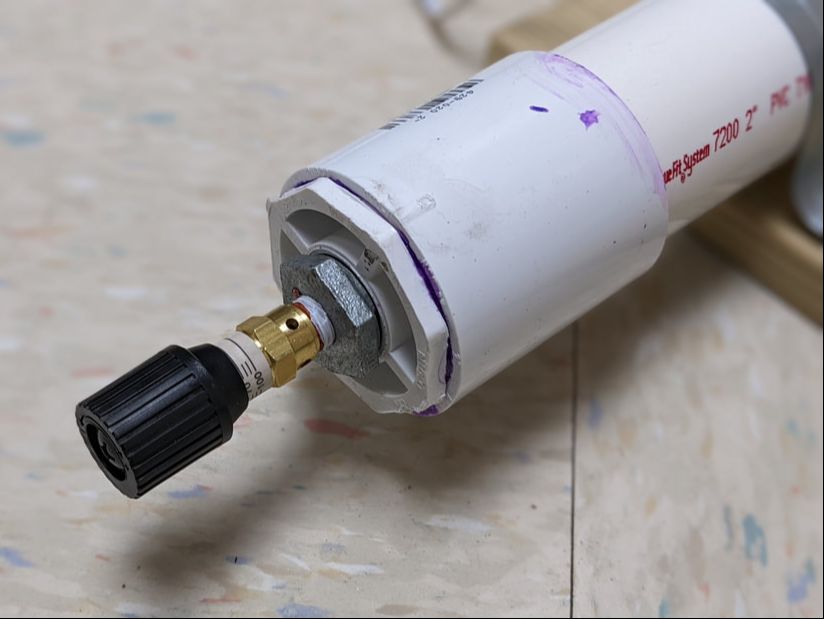
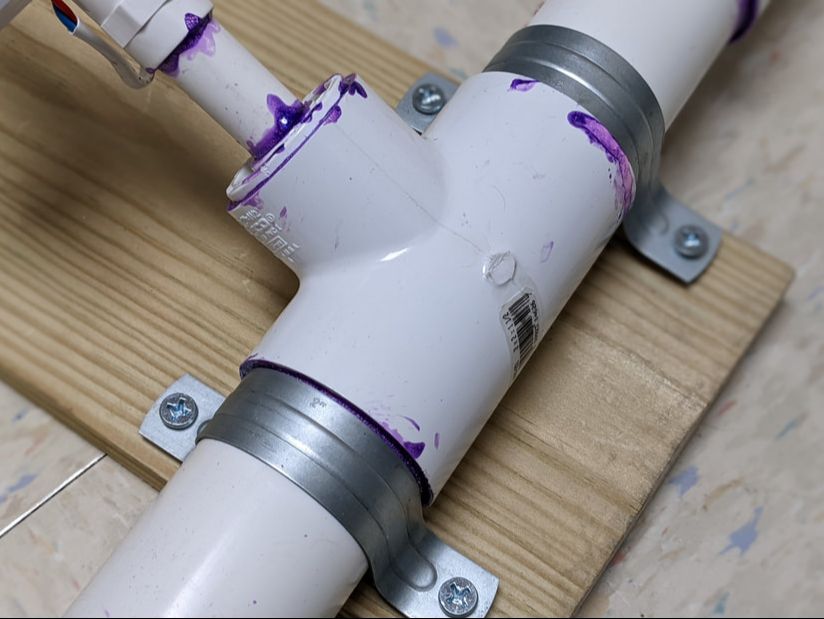
Building a LauncherThe launcher is really what made this all possible and I'm excited to have these made to use now from year to year. It is pressurized with a standard bike pump and releases with the push of a button thanks to a special DIY button activated sprinkler valve assembly that you can buy from amazon. Since the valve was button activated, I could start pressurizing between launches and we were averaging about two rockets a minute per launcher. We made a couple so that we could accommodate multiple classes of students. To make the launchers, I used this Instructables walkthrough as a starting point with some modifications to add a pressure limiter and make the launch angle easily adjustable. I would encourage you to check out the Instructables write up first to get a solid background for the build and pay close attention to the safety note below. 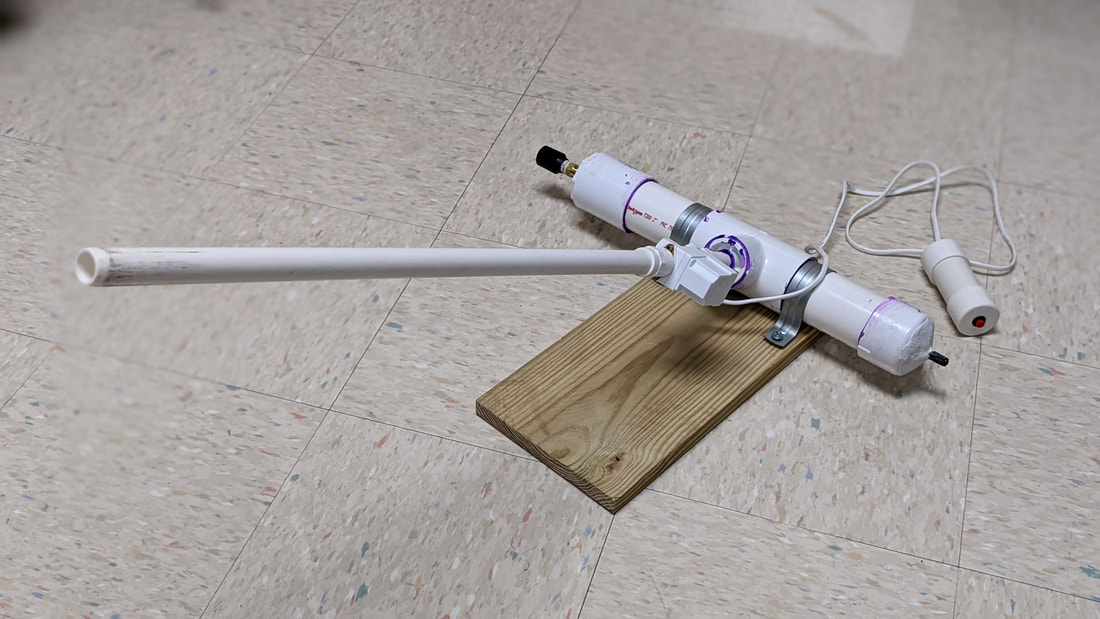 To fit my needs, I made a couple of modifications so here is an overview of my version of the build Important note about safety When selecting materials, make sure that the components are rated to handle pressurization or the launcher may experience a catastrophic failure. The DWV (Drain, Waste, and Vent) PVC is not designed to handle any pressure at all so it is crucial that you select properly rated Schedule 40 pipes and fittings. Furthermore, when testing and launching, make sure that the launch area is always clear when the launcher is pressurized (even when there is no rocket loaded) and never pressurize the tank above 100 psi. If you use the pressure relief valve that I added for my modified design, that component will prevent any overeager pumpers from going too far and it can be adjusted to any target pressure below 100 psi. I found that 60-80 psi was plenty for what I needed :) Materials:
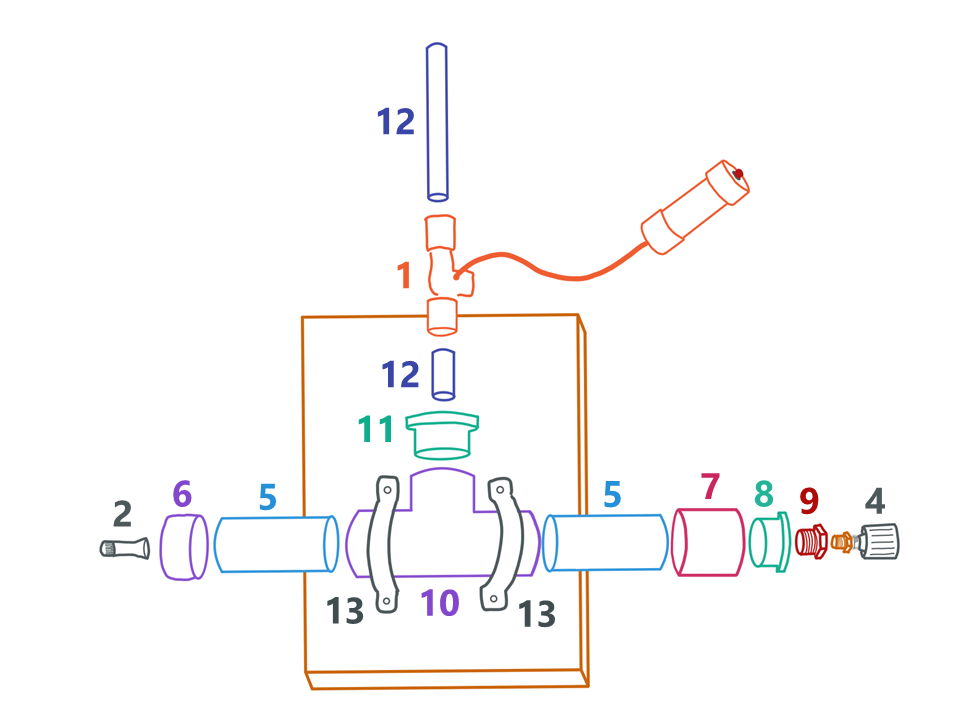 Step 1: Cut 2" PVC (5) and 1/2" PVC (12) to the proper lengths with a hack saw or PVC cutter. Use a file to slightly taper one end of the long 1/2" PVC launch tube so that rockets can easily slide on.
Step 3: Using PVC cement (14) glue all PVC components (including the button activated valve (1) bushing) together and let dry. You might be able to get away with a press fit for the launch tube since it is on the other side of the valve from the pressure chamber.
Once everything is assembled, you should be able to hook the launcher up to a standard bike pump, pressurize it to 60-80 psi, release the valve by pushing the button, and watch your rocket fly :) I have used this now with kids as young as my own (2 and 4 years old) as well as other physics teachers at workshops and everyone is equally excited to see something that they created blast off in such a satisfying way. When all was said and done, the cost per launcher came to around $80 each but once you have it made, it should last so that the only thing needed to do this project again is some more paper and tape!! 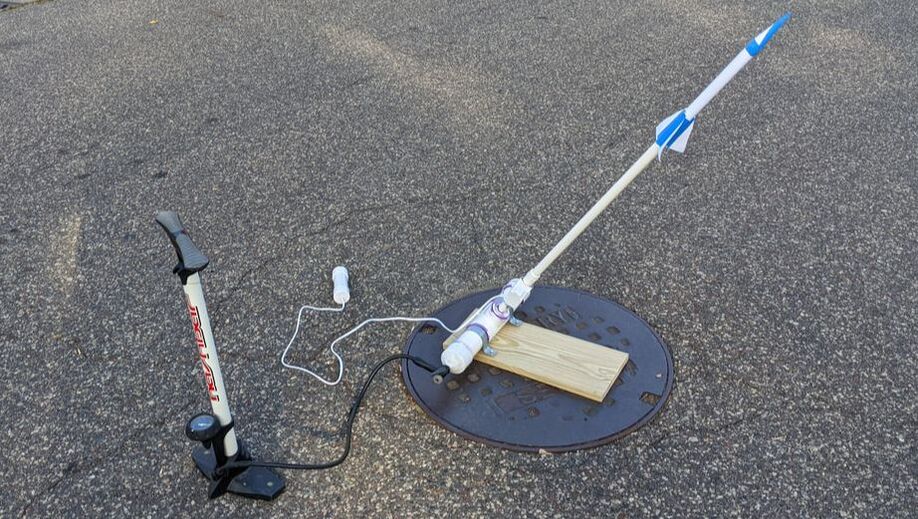 Files
Click for more Motion resources ⬇ 
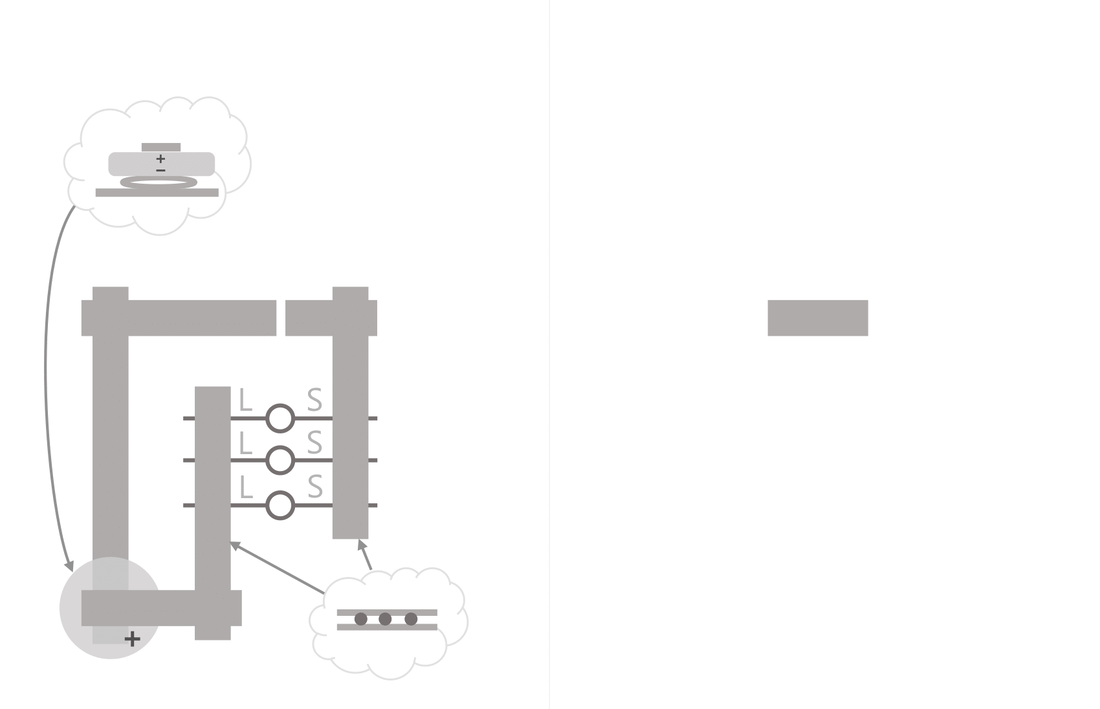
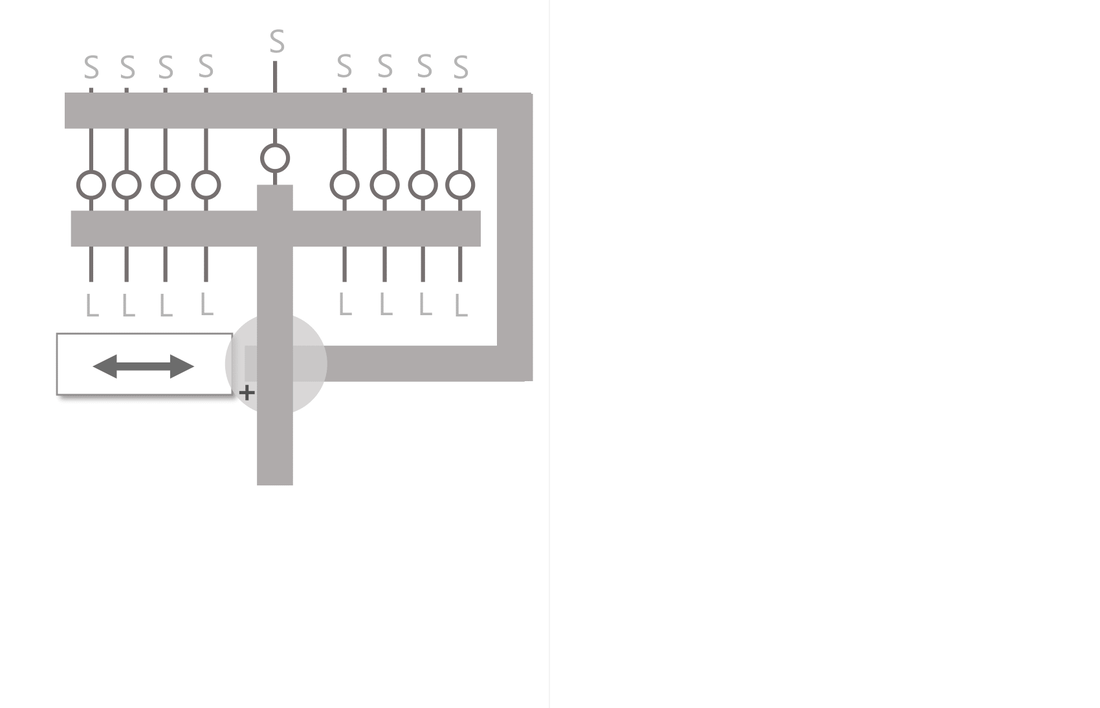
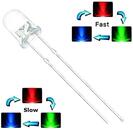
MaterialsFor this project, I organized materials for over 500 students to make a card of their own so I ordered A LOT of supplies. In the end, the total cost per card came to around $0.50. Since we didn't have quite enough in our science budget for all of this, we encouraged students to bring in $1 to help with the overall cost (but didn't keep track or prevent anyone from participating if they didn't bring in money). Cardstock For the card itself, we printed the templates included below on cardstock. It is highly recommended to use cardstock rather than standard weight paper to help give the card the needed rigidity Batteries To power the paper circuits, we got CR2032 3-volt button batteries in 100-packs. It's pretty easy to find these from a store but they often run over $1 per battery. In the end, the bulk batteries that we found came to around $0.20 each. CR2032 Button Battery | 100-pack LEDs I'm amazed at how cheap you can find LEDs these days! For this project, we got two different packs of LEDs for students to choose from. I recommend planning for around 5 bulbs per student with the templates below.
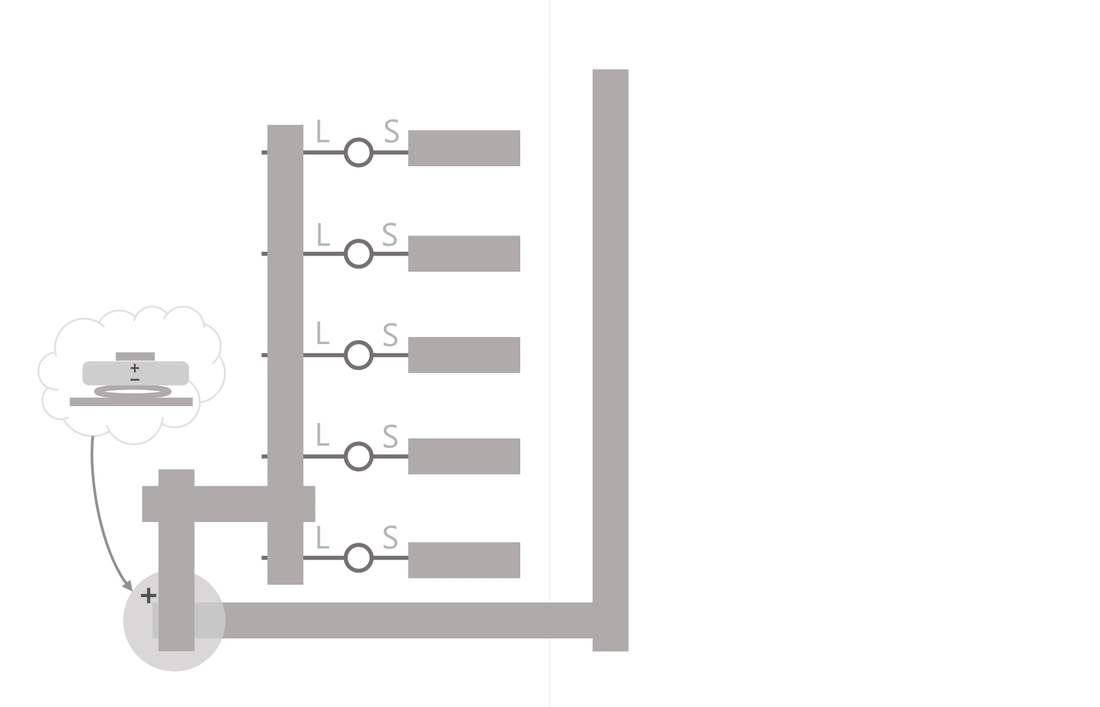
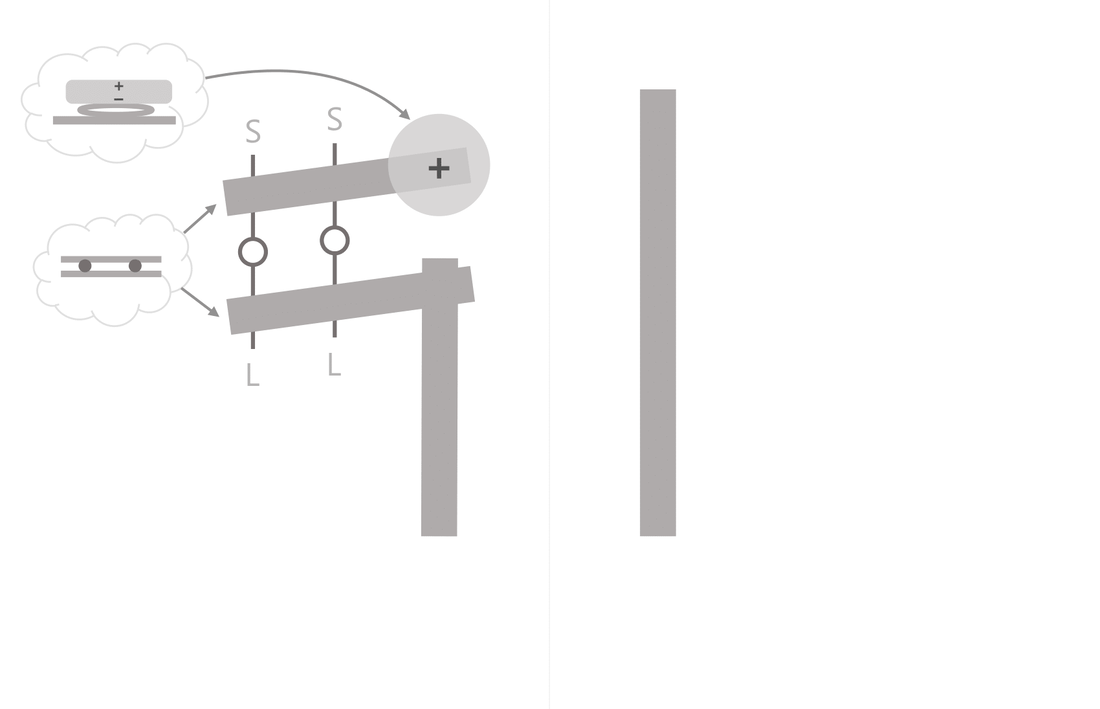
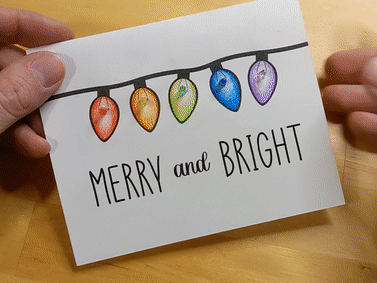
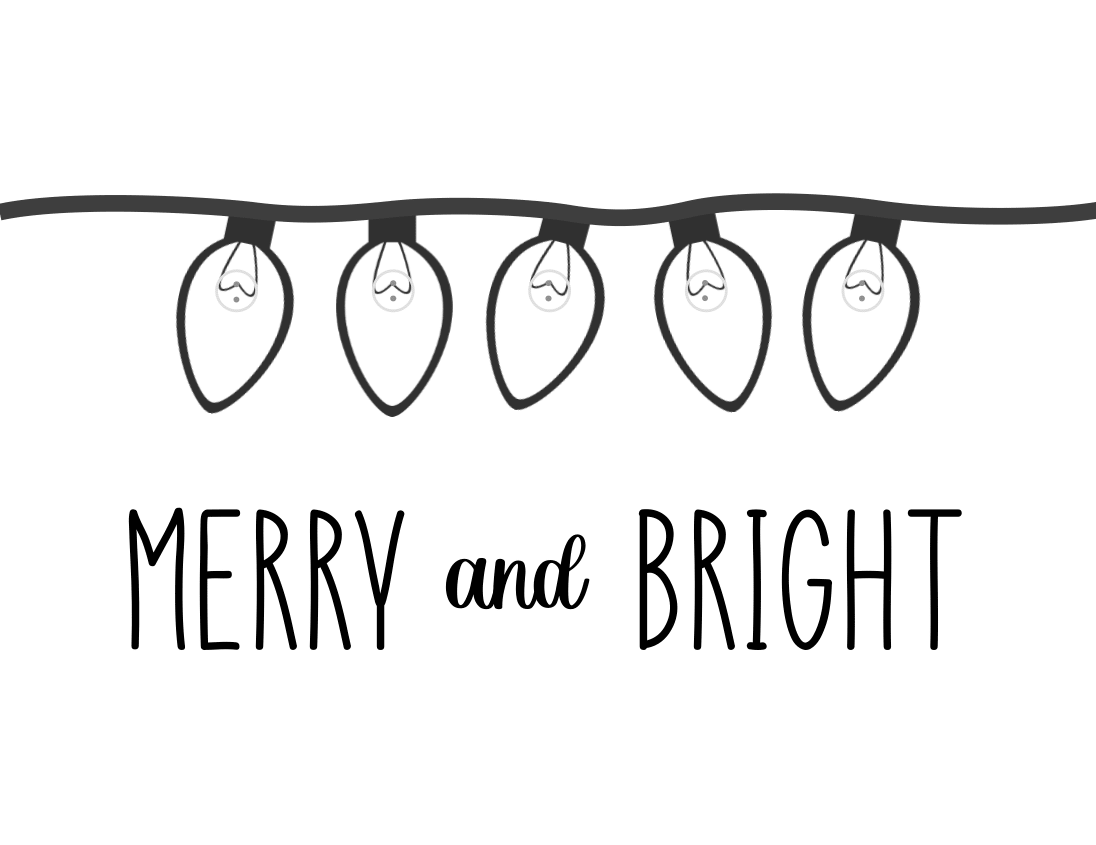
Construction TipsThere are a few different building tips that are important for anyone making one of these electronic cards for the first time. Color First Once the batteries and bulbs are added, the circuit becomes pretty "lumpy" so it's a good idea to add color before putting the rest on. Pre-Poke the Holes The templates provide two little dots were each of the LEDs needs to go. While it is possible to use the LED leads themselves to poke these through, it is so much better to pre-poke these holes. I recommend setting the card down on a piece of cardboard and using a push pin to poke through the cardstock in the desired locations. Pay Attention to LED Polarity LEDs will only work in one direction so it is important that the long side of the LED is connected to the positive terminal of the battery. The templates have an "L" and "S" to indicate the location of the long and short side. Some LEDs Don't Play Well Together Since different colors of LEDs have different voltages, they impact the rest of the circuit even when connected up in parallel. Because of this, red, green, and yellow LEDs can light up at the same time and blue and white LEDs can light up at the same time but these different "sets" of colors can't be mixed. There are work arounds that require extra resistors but I wasn't interested in adding more complexity ;) The "Merry and Bright" example that I included at the top of this post works with all of the colors because they are never on at same time.
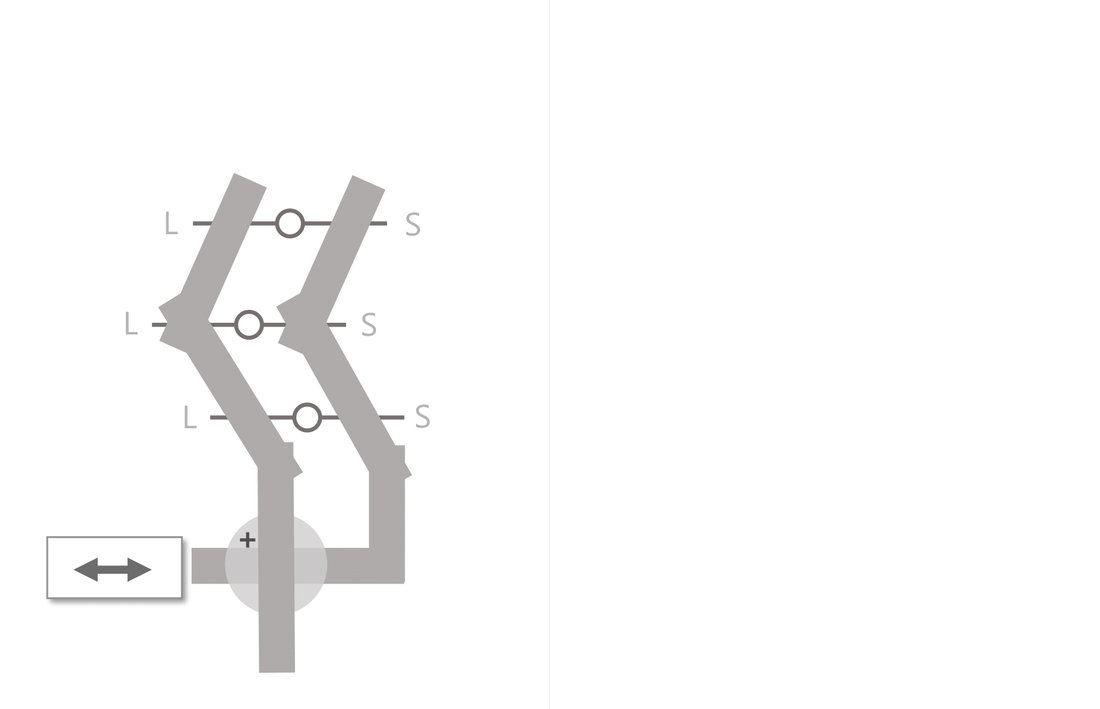
Add a Slider Switch Some of the templates close the switch when the card is closed by using the space on the other side of the fold to add some maker tape. Other templates require a slider switch. This can be created by cutting a strip of cardstock and sliding it underneath the battery. The switch breaks the connection with the maker tape below the battery. You can also wrap a portion of the slider with maker tape so that it doesn't have to be fully removed to complete the circuit. TemplatesYou don't need a template to make a light up paper circuit card but it can be a nice guide if you have limited resources, expertise, or time. I wasn't excited by the switchless templates that I found that only utilized 1 or 2 LEDs so I set out to make my own to provide my students with a few different options that they were interested in. The templates can be downloaded for free by clicking on the links below. The file should be printed front to back so that the circuit template is on the inside of the card. Check out the demo videos below to see what each of the cards looks like in action! :)
Merry and Bright
 Tree
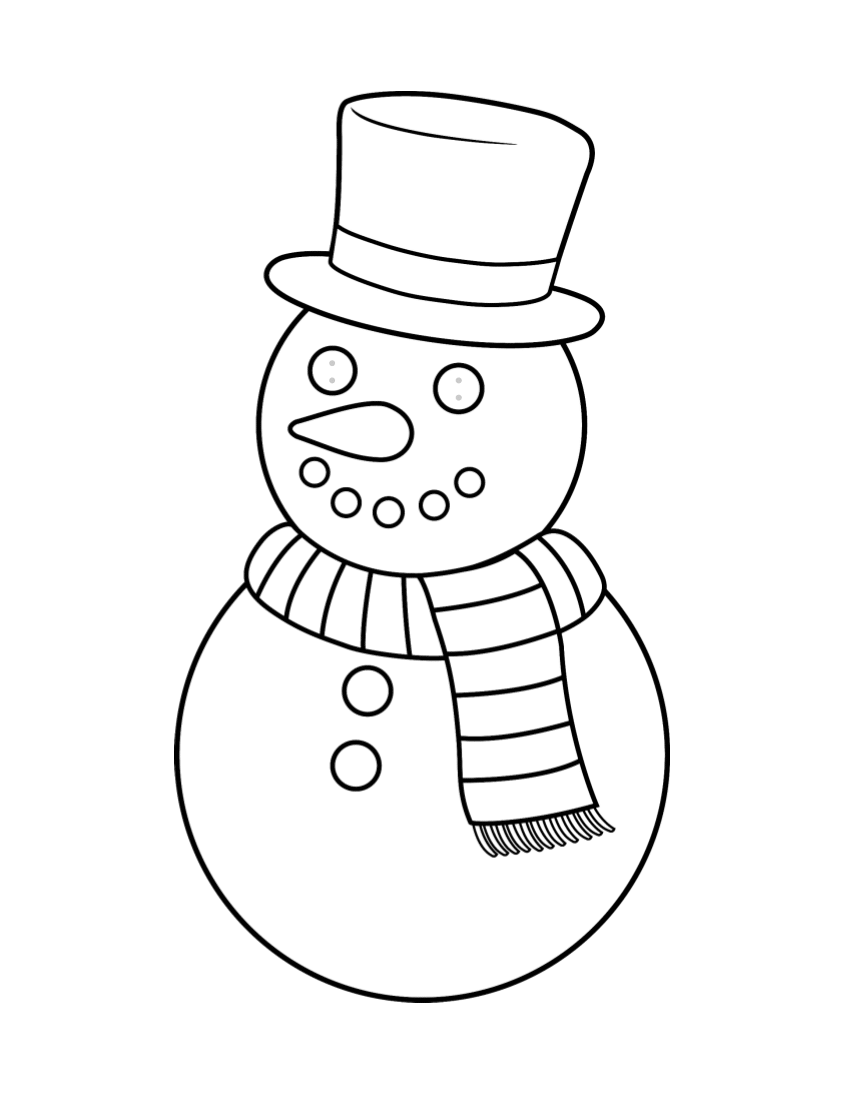
 Snowman
 Gingerbread Man
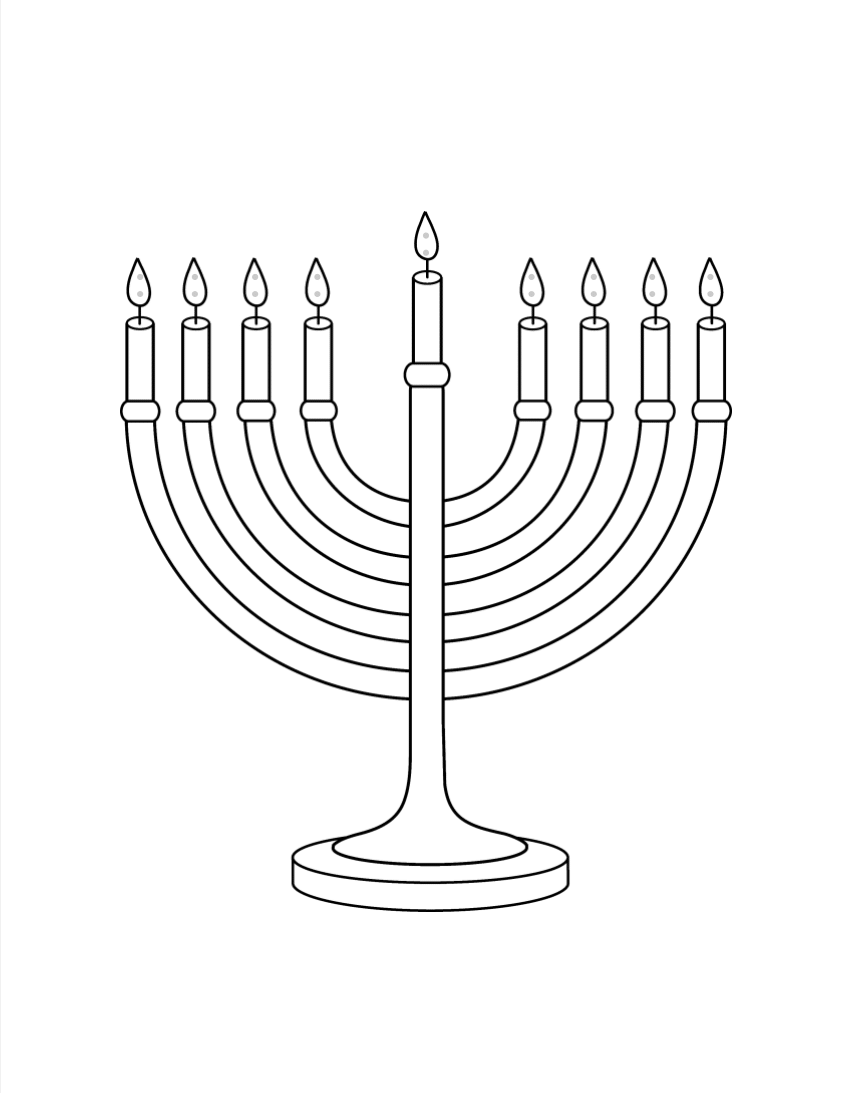
 Menorah
 Click for more Electricity resources ⬇  The Premise
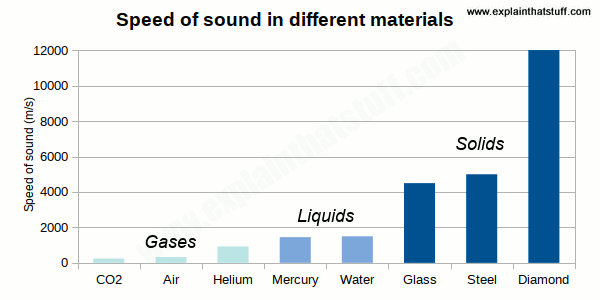
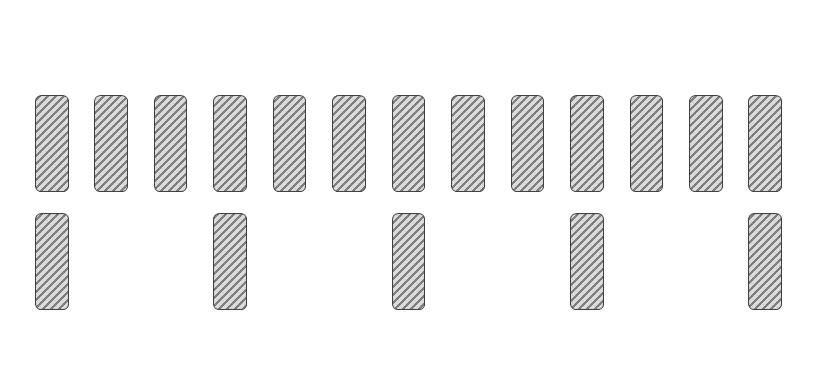
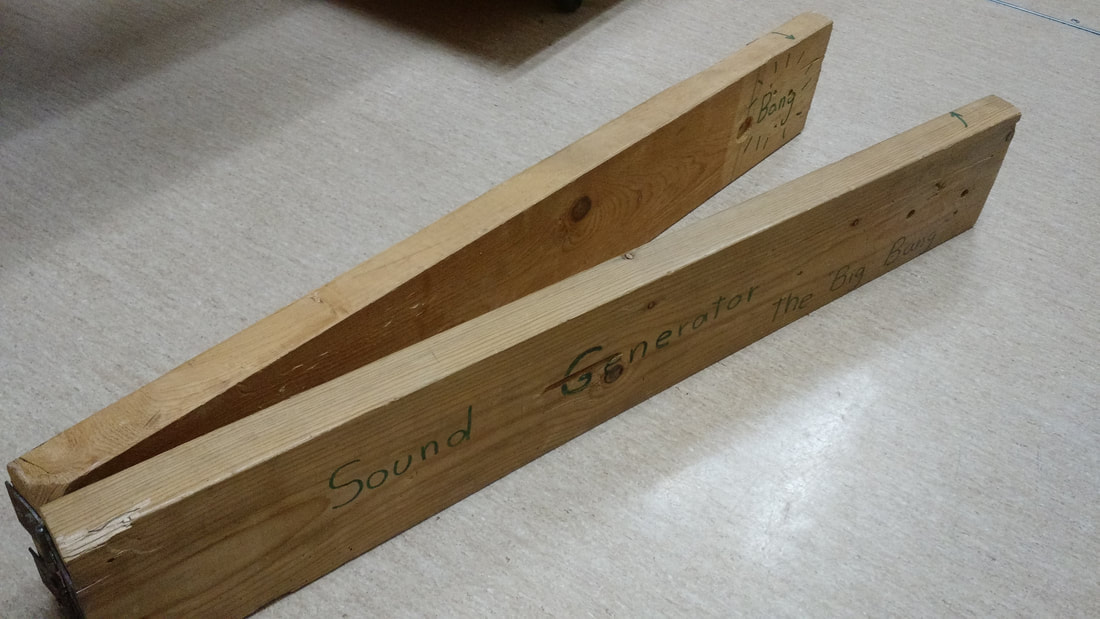
I wanted to provide students with some sort of hands on demonstration that helps them visualize and remember this relationship rather than just memorize that sound travels faster through steel than water. In this model, dominos are used to represent the spacing between molecules in a substance propagating a sound wave. Setting up the Dominos
Capturing the ResultIt all happens really fast and it's really hard to tell "who won" in real time. Because of this, I have students capture this in slow-mo on their phones or tablets and watch back the footage. Things to Keep in Mind:
Is this Model Perfect?No. As with almost every physical model representing a hard to visualize phenomenon, this model has more than it's fair share of limitations. I would argue however that at the high school level being able to relatively rank the speed of sound through a typical solid, liquid, and gas is about as much as students really need. To that end, I think this domino wave model provides a really nice experience for students to hook on to and remember. SimulationThere was a simulation of this concept posted on reddit (thanks to @UniverseAndMore for spotting it). It does a nice job of making this difference between solid/liquid/gas even clearer. 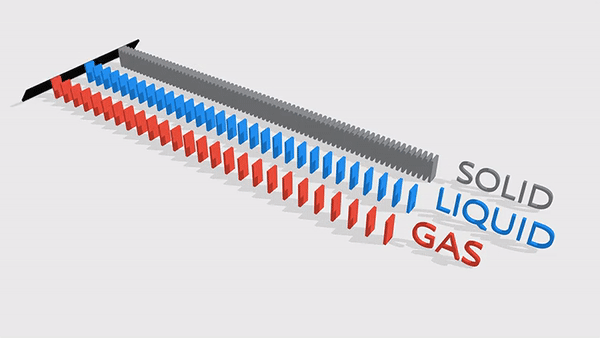 This post is part of larger collection of my favorite science demonstrations CLICK HERE FOR MORE DEMOSRelated LessonsClick for more Waves resources ⬇  |

Joe CossetteFather, Physics Teacher, Knowles Fellow, Friend, Techie, and Musician Blog Posts |
||||||||||||||||||||||||||||||||||||||||||||||||||||||||||||||||||||||||||||||||||||||||||||||||||||||||||||||||||||||||||||||||||||||||||||||||||||||||||||||||||||||||||||||||||||||||||||||||||||||||||||||||||||||||||||||||||||||


 RSS Feed
